


GOLFJOY OPEN Returns to Beijing: A Grand Celebration at the Prestigious Reignwood Golf Club
After a six-year hiatus, the GOLFJOY OPEN is set to make a triumphant return to Beijing, marking a significant milestone in the world of golf. This highly anticipated event will take place from September 8th to 16th at the illustrious Reignwood Golf Club, a premier, members-only club that epitomizes luxury and exclusivity in China.
Nestled in the scenic Changping District, Reignwood Golf Club spans an impressive 6,400 acres and boasts two 18-hole championship courses and a 9-hole lighted course, all masterfully designed by the legendary “Golden Bear” Jack Nicklaus and his son. The Nicklaus Course, known for its rugged beauty and strategic complexity, stretches 7,572 yards with a Par 72, offering a challenging yet rewarding experience for golfers. Its proximity to the Great Wall and Yanshan Mountains adds a breathtaking backdrop, making it a true gem in the golfing world.

Reignwood Golf Club has a storied history of hosting prestigious international tournaments, including the European Tour and the Asian Tour. The selection of the Nicklaus Course for the 2025 GOLFJOY Open is a testament to its world-class facilities and the vibrant golfing culture in the capital city. This event not only elevates the status of golf in Beijing but also serves as a high-caliber tribute to our nation.
The Nicklaus Course is renowned for its dynamic design, which takes into account sunlight, wind direction, and seasonal changes, offering a balanced blend of power and finesse. It demands strategic thinking and resilience from players, ensuring that the victor truly earns their title.
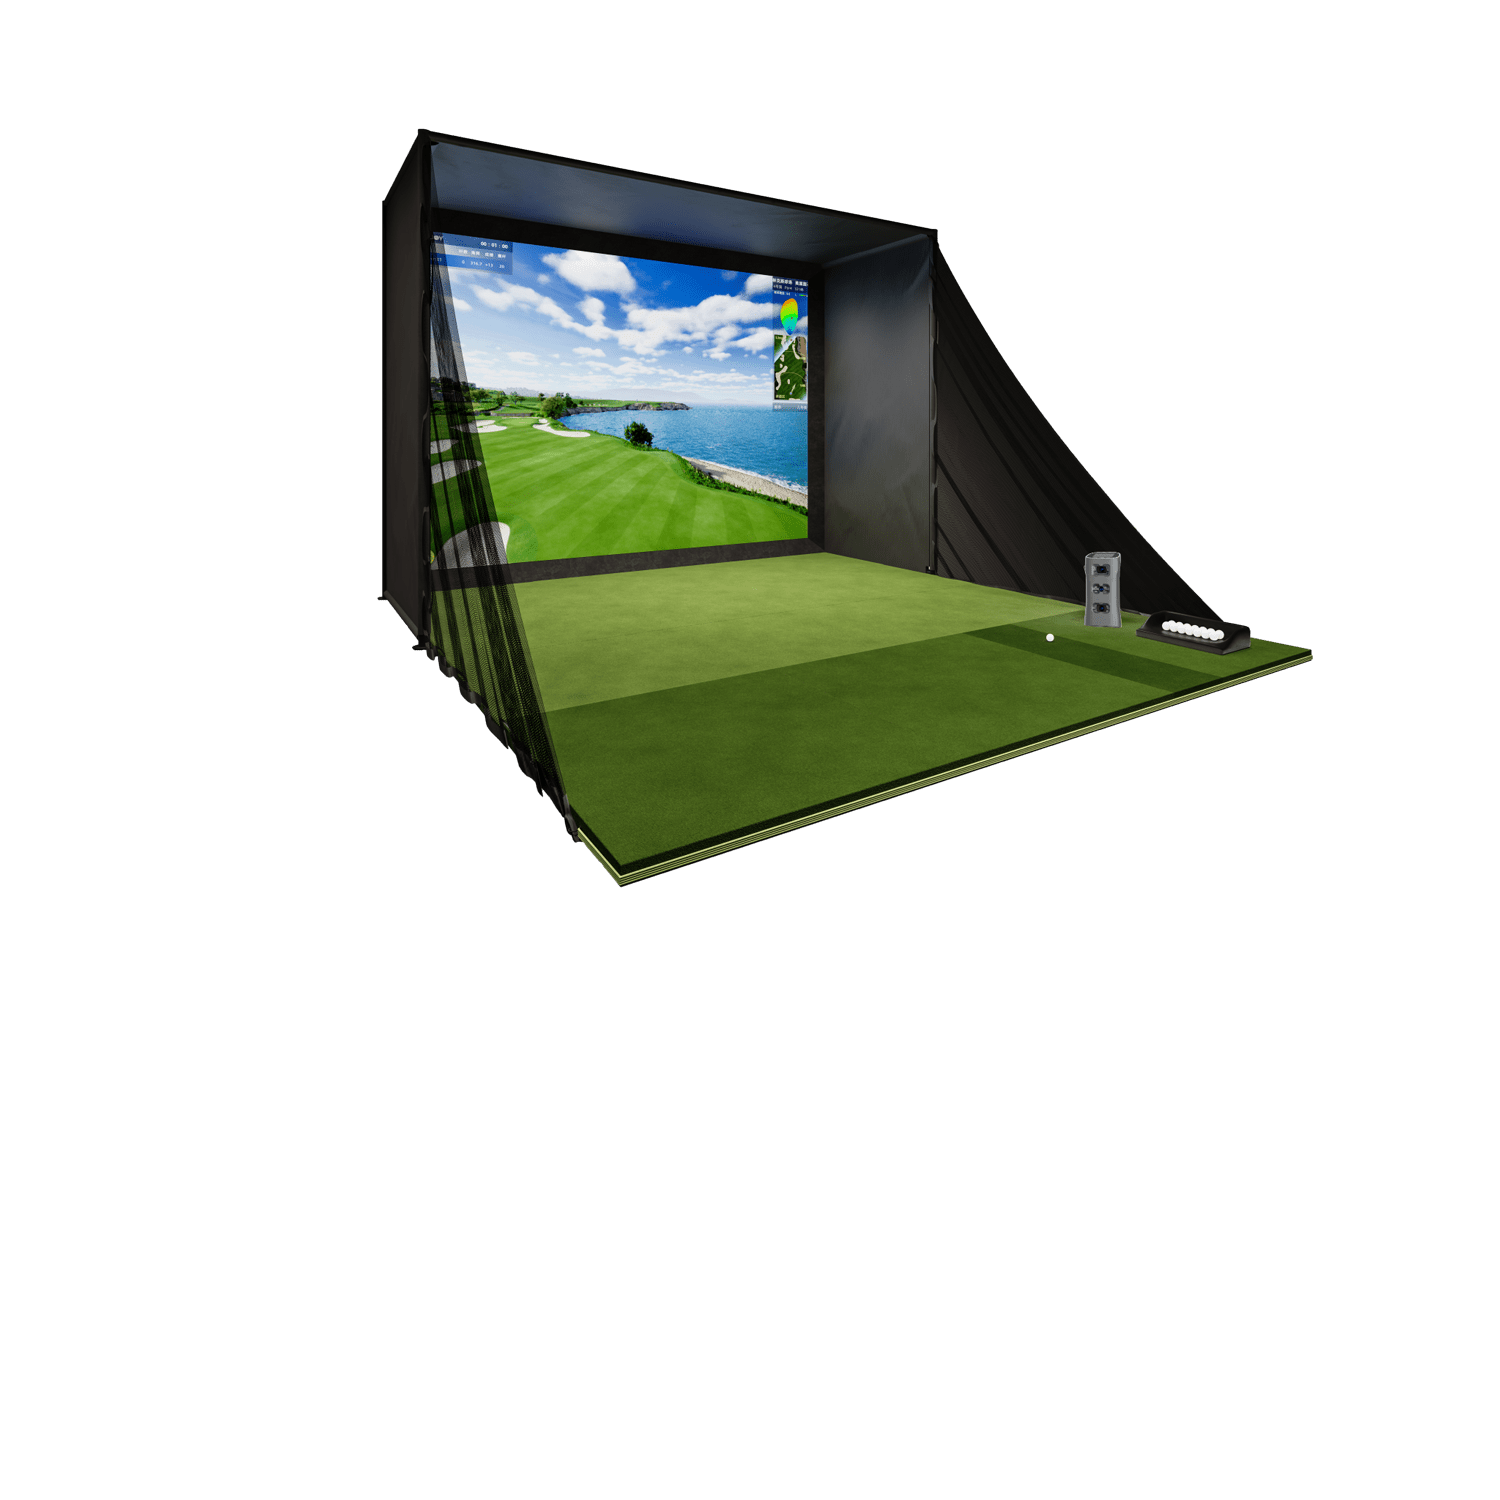
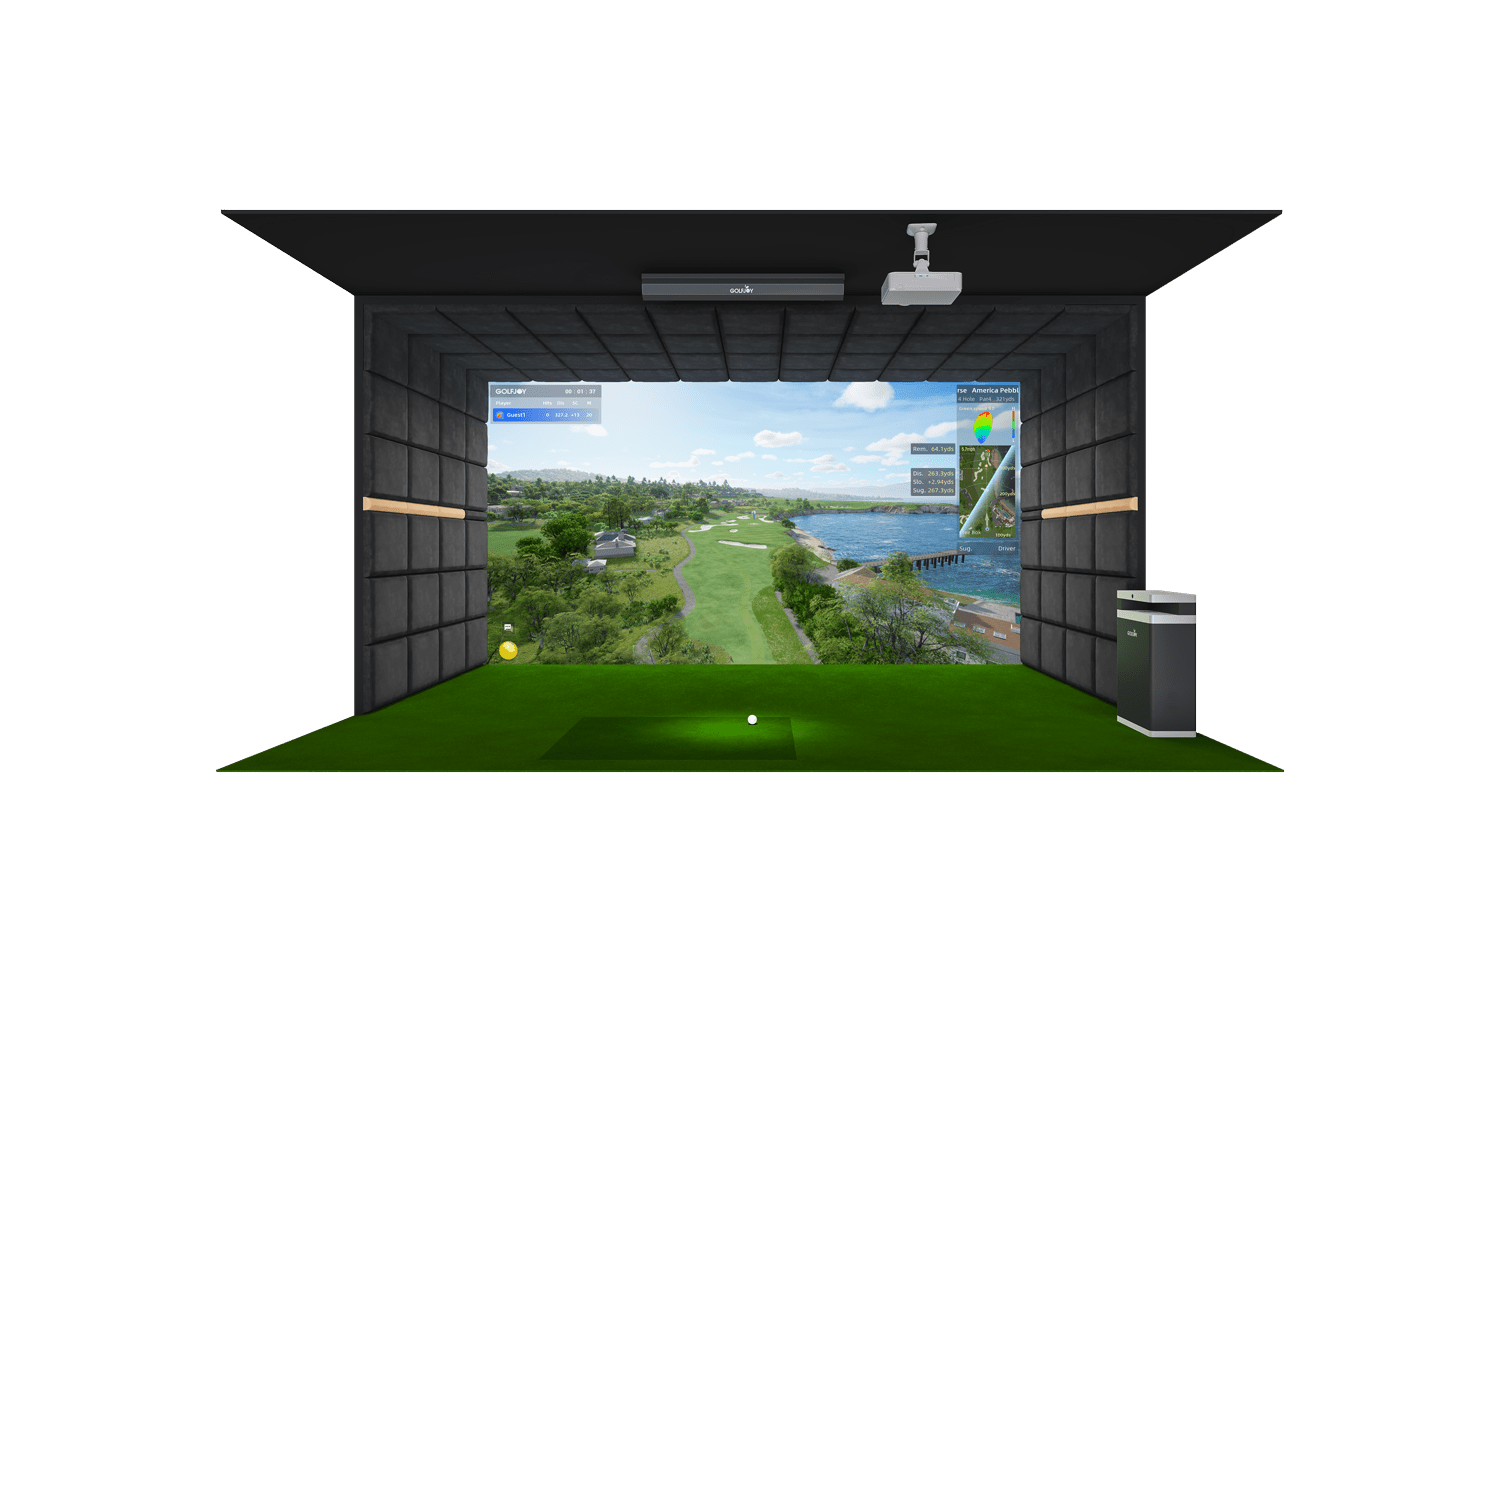
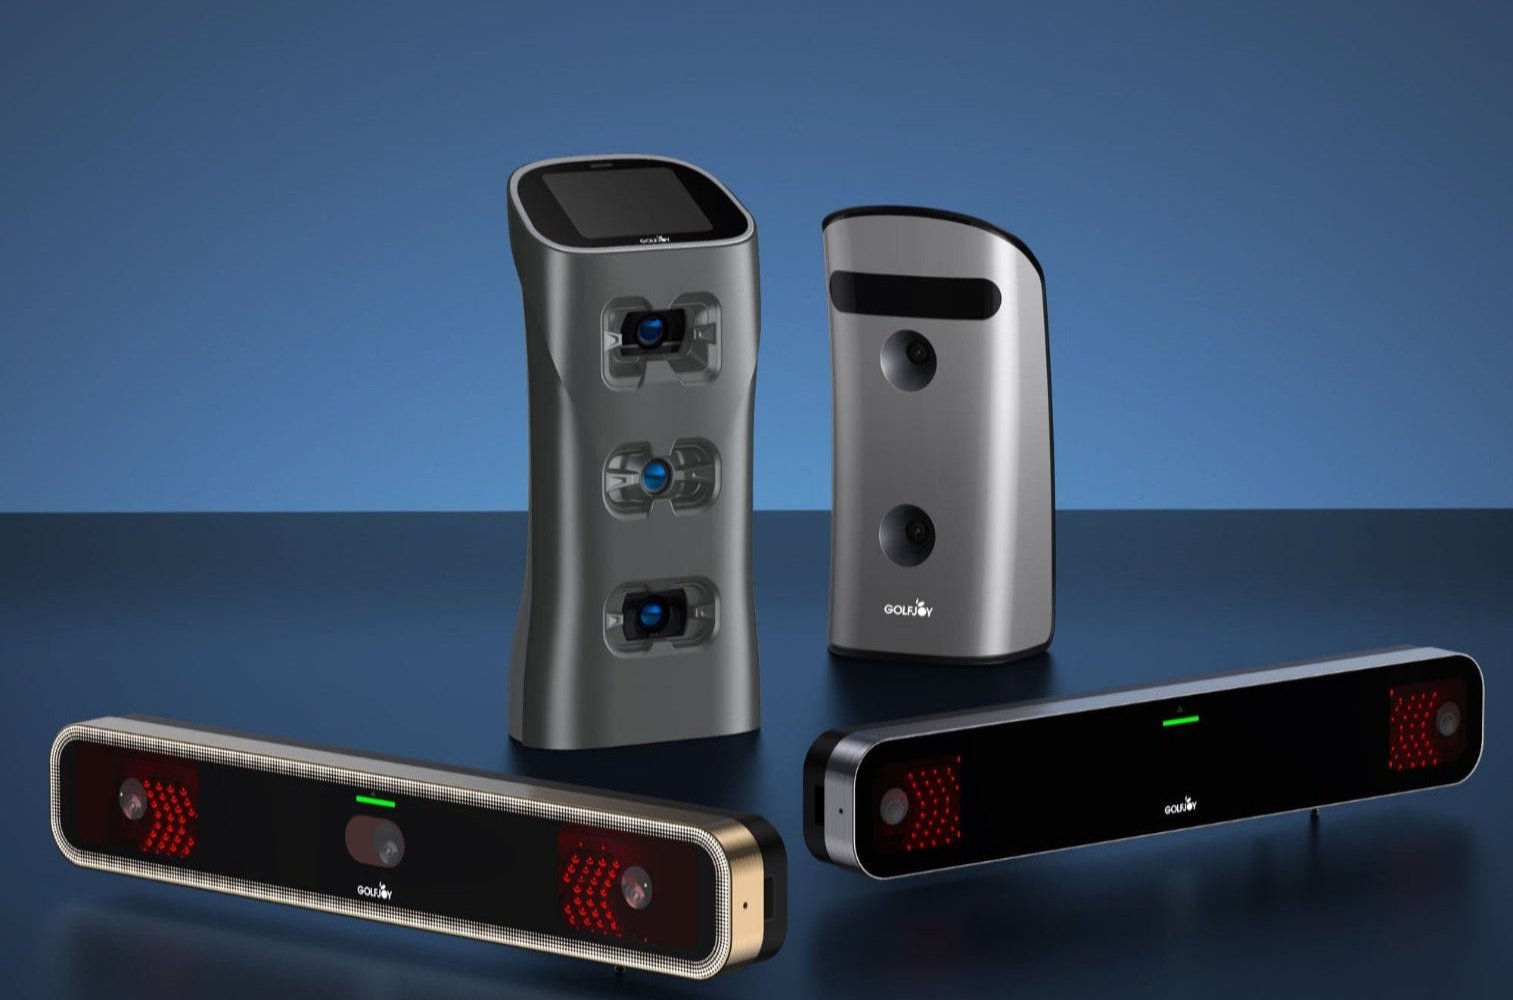
Before experiencing the thrill of the tournament in person, fans can explore the Nicklaus Course’s unique features through GOLFJOY’s 1:1 course simulation technology, providing an immersive preview of what lies ahead.
The Anatomy of a Golf Hole
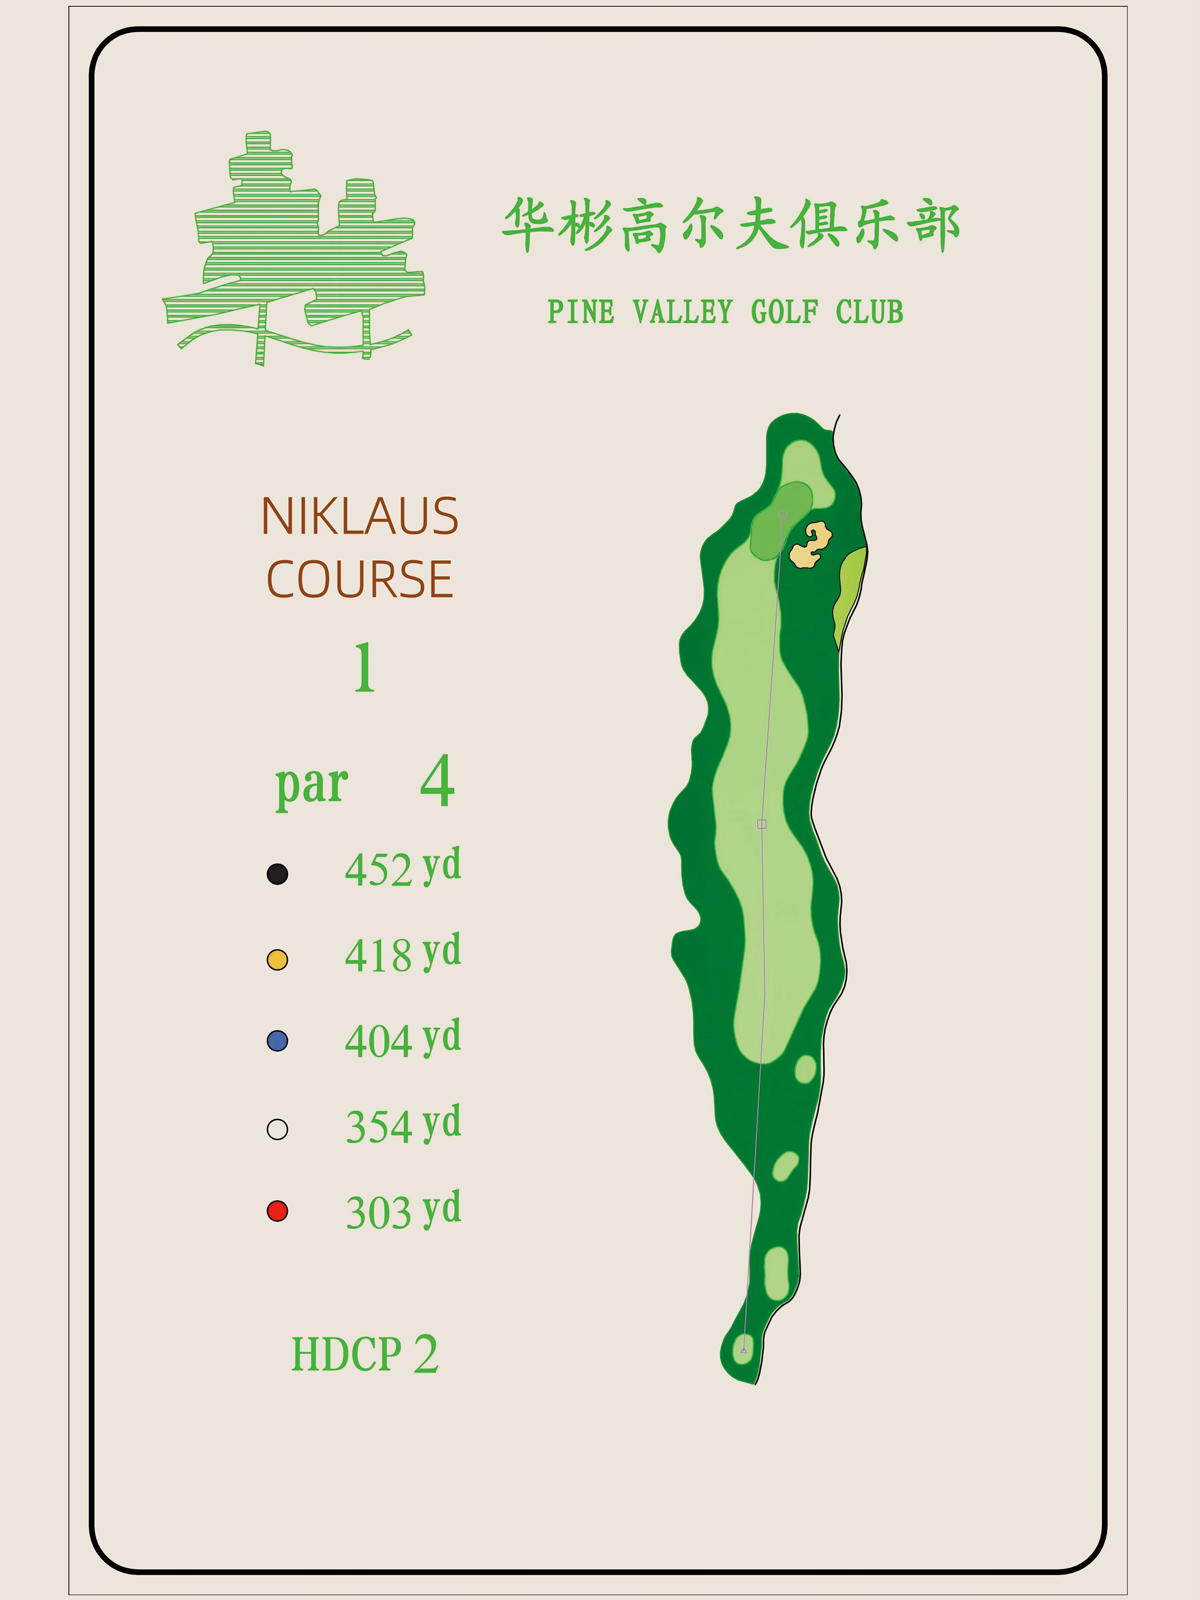
The first hole is quite friendly, starting from the gold tee. It is a relatively short par 4 with no obstacles off the tee, so aim for the center of the fairway. However, precision is crucial when approaching the green, especially in terms of left-right accuracy. Aim left rather than right, as the bunker on the right is very deep. Try to secure your first par. There is a landing area behind the green, so if you overshoot, you can chip back.

This is a slight left dogleg par 4. The landing area before the right bunker is about 290 yards away, with a fairway width of approximately 50-60 yards. Players who excel at hitting a draw can aim for the left edge of the right bunker. Those who prefer a fade can aim left of the fairway but should avoid over-fading into the right bunker. When approaching the green, aim right rather than left, as there is a landing area on the right side of the green. Also, ensure your shot carries enough distance to clear the front hazards.
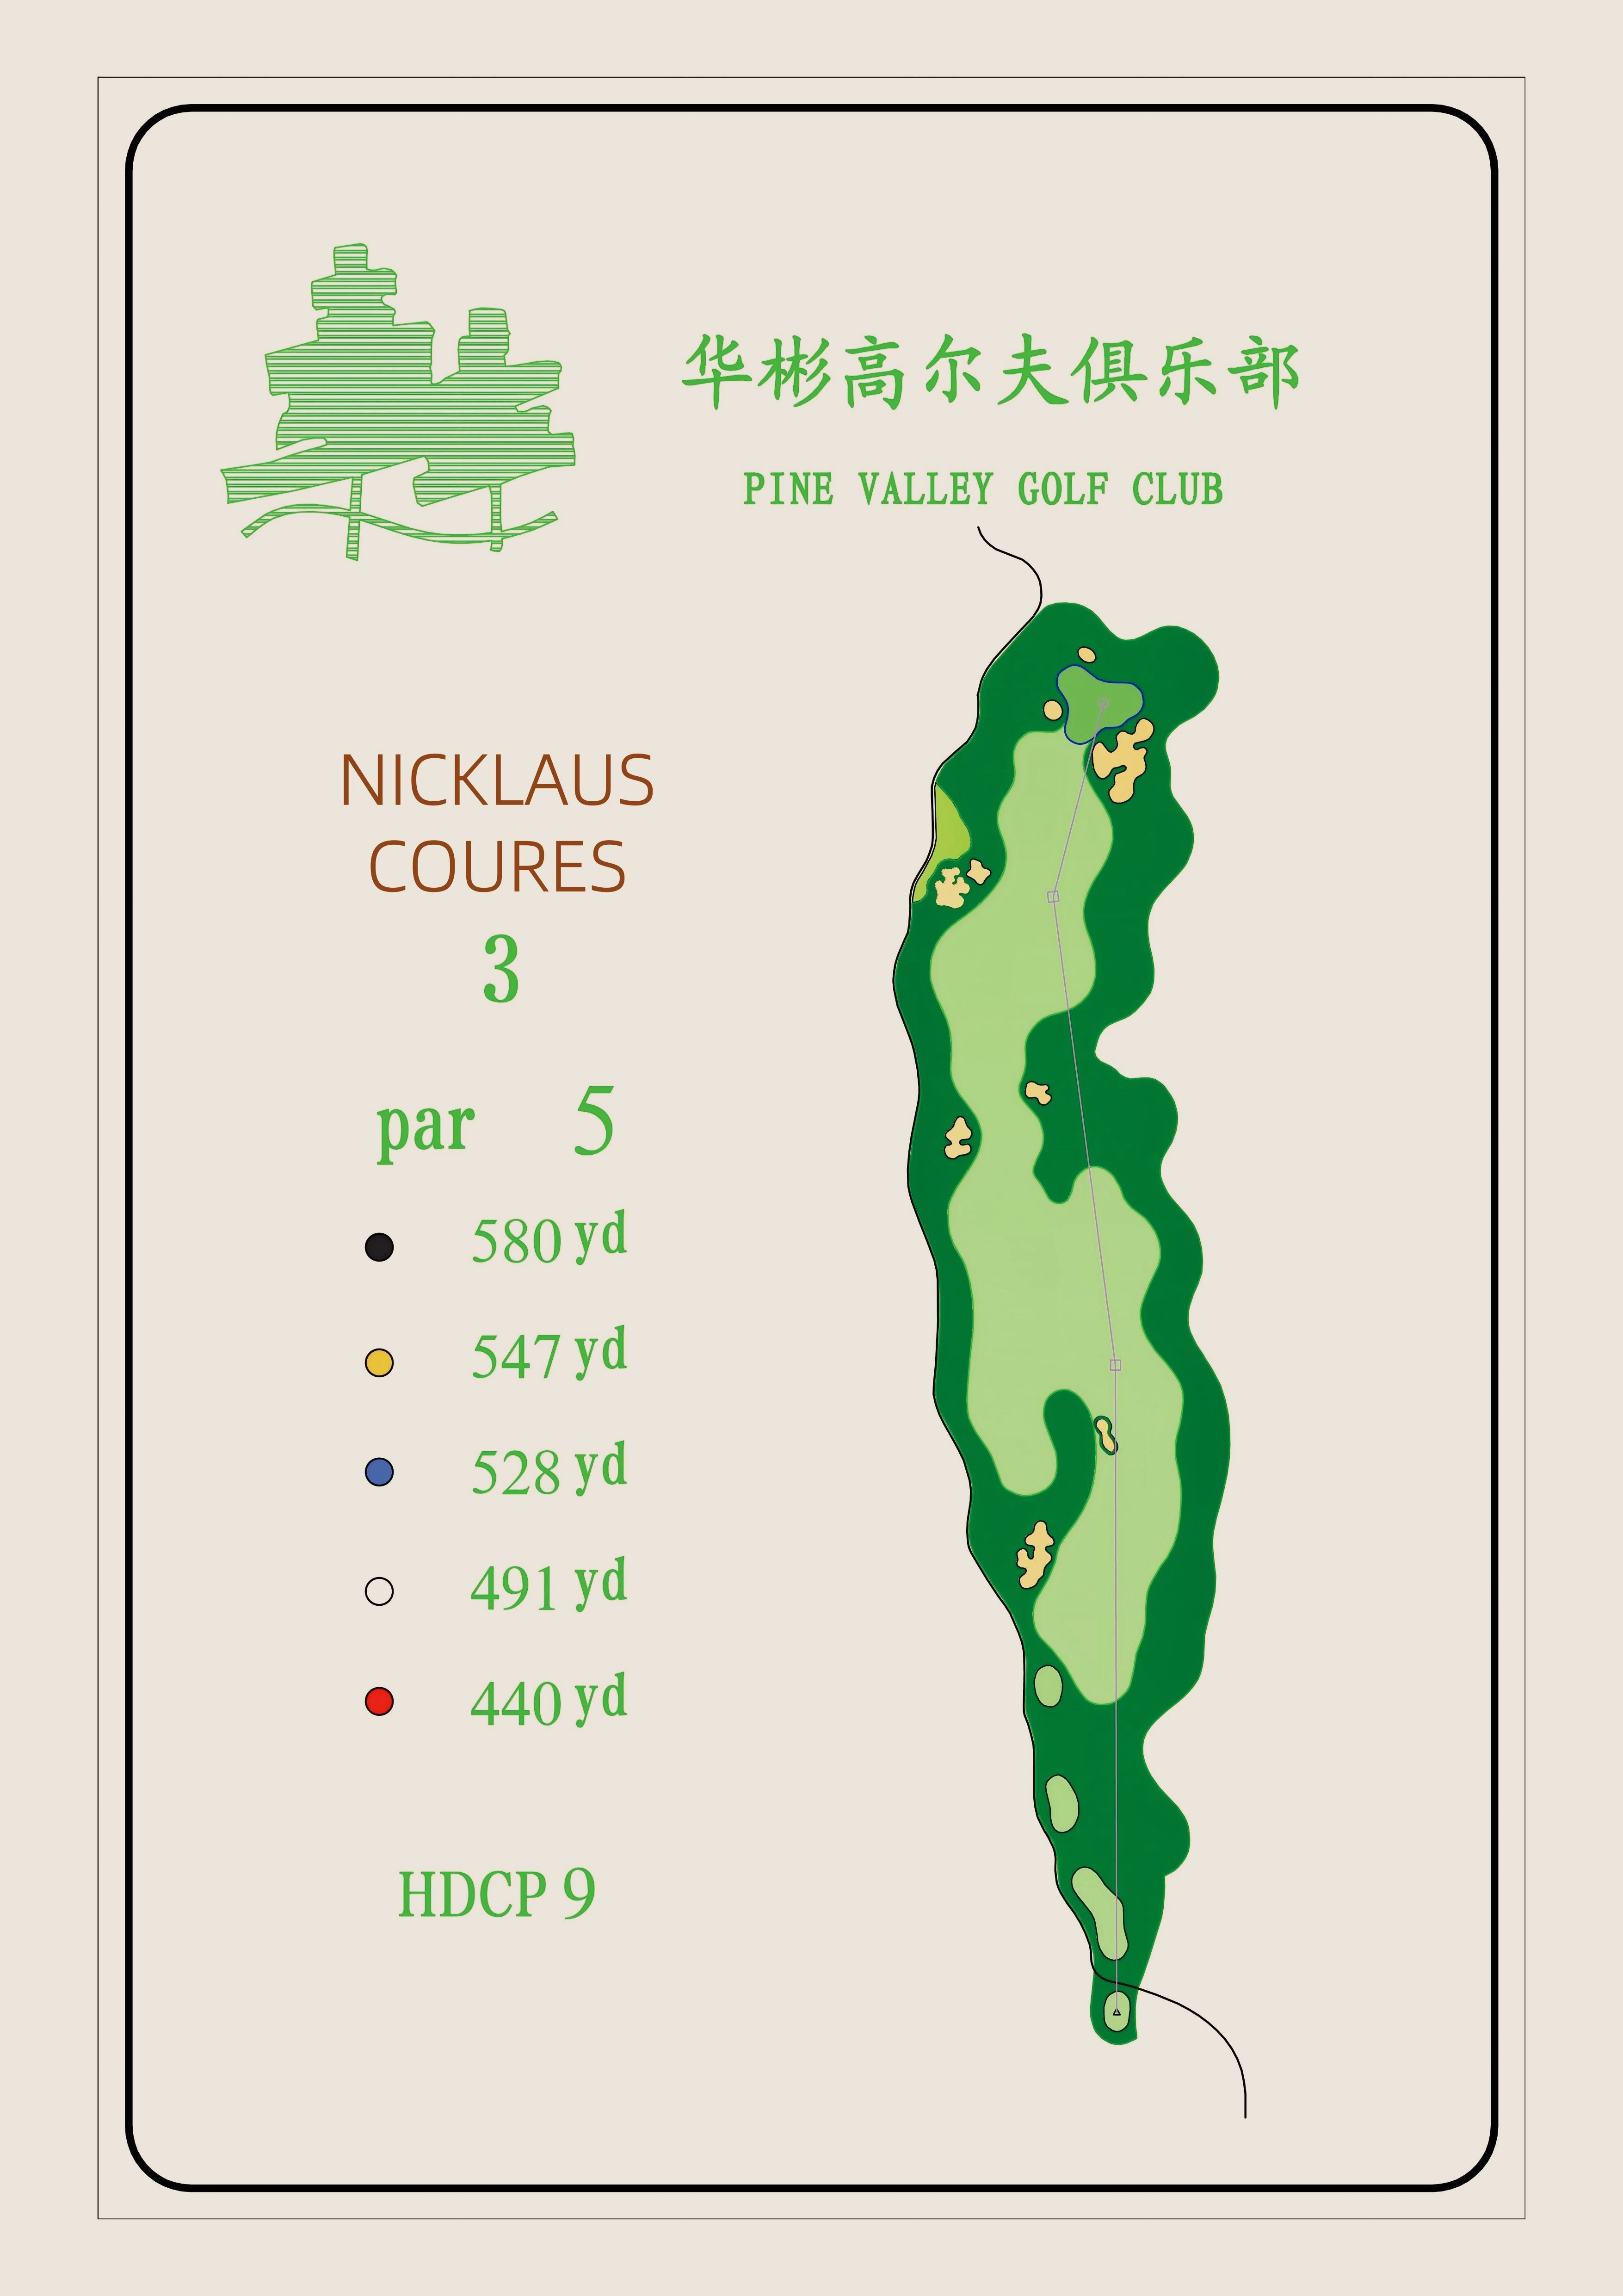
The landing area for the tee shot is 250 yards, clearing all the front bunkers. Beyond the bunkers, the fairway slopes downhill, likely resulting in a downhill lie with the left foot lower than the right. The second shot needs to clear the right-side bunker in the middle. Instead of blindly using a 3-wood, a higher-lofted hybrid might be a better choice. Long hitters can aim for a landing area between 290-310 yards, where the fairway is about 60 yards wide. The second shot to the green is approximately 240-250 yards, making it possible to reach in two.
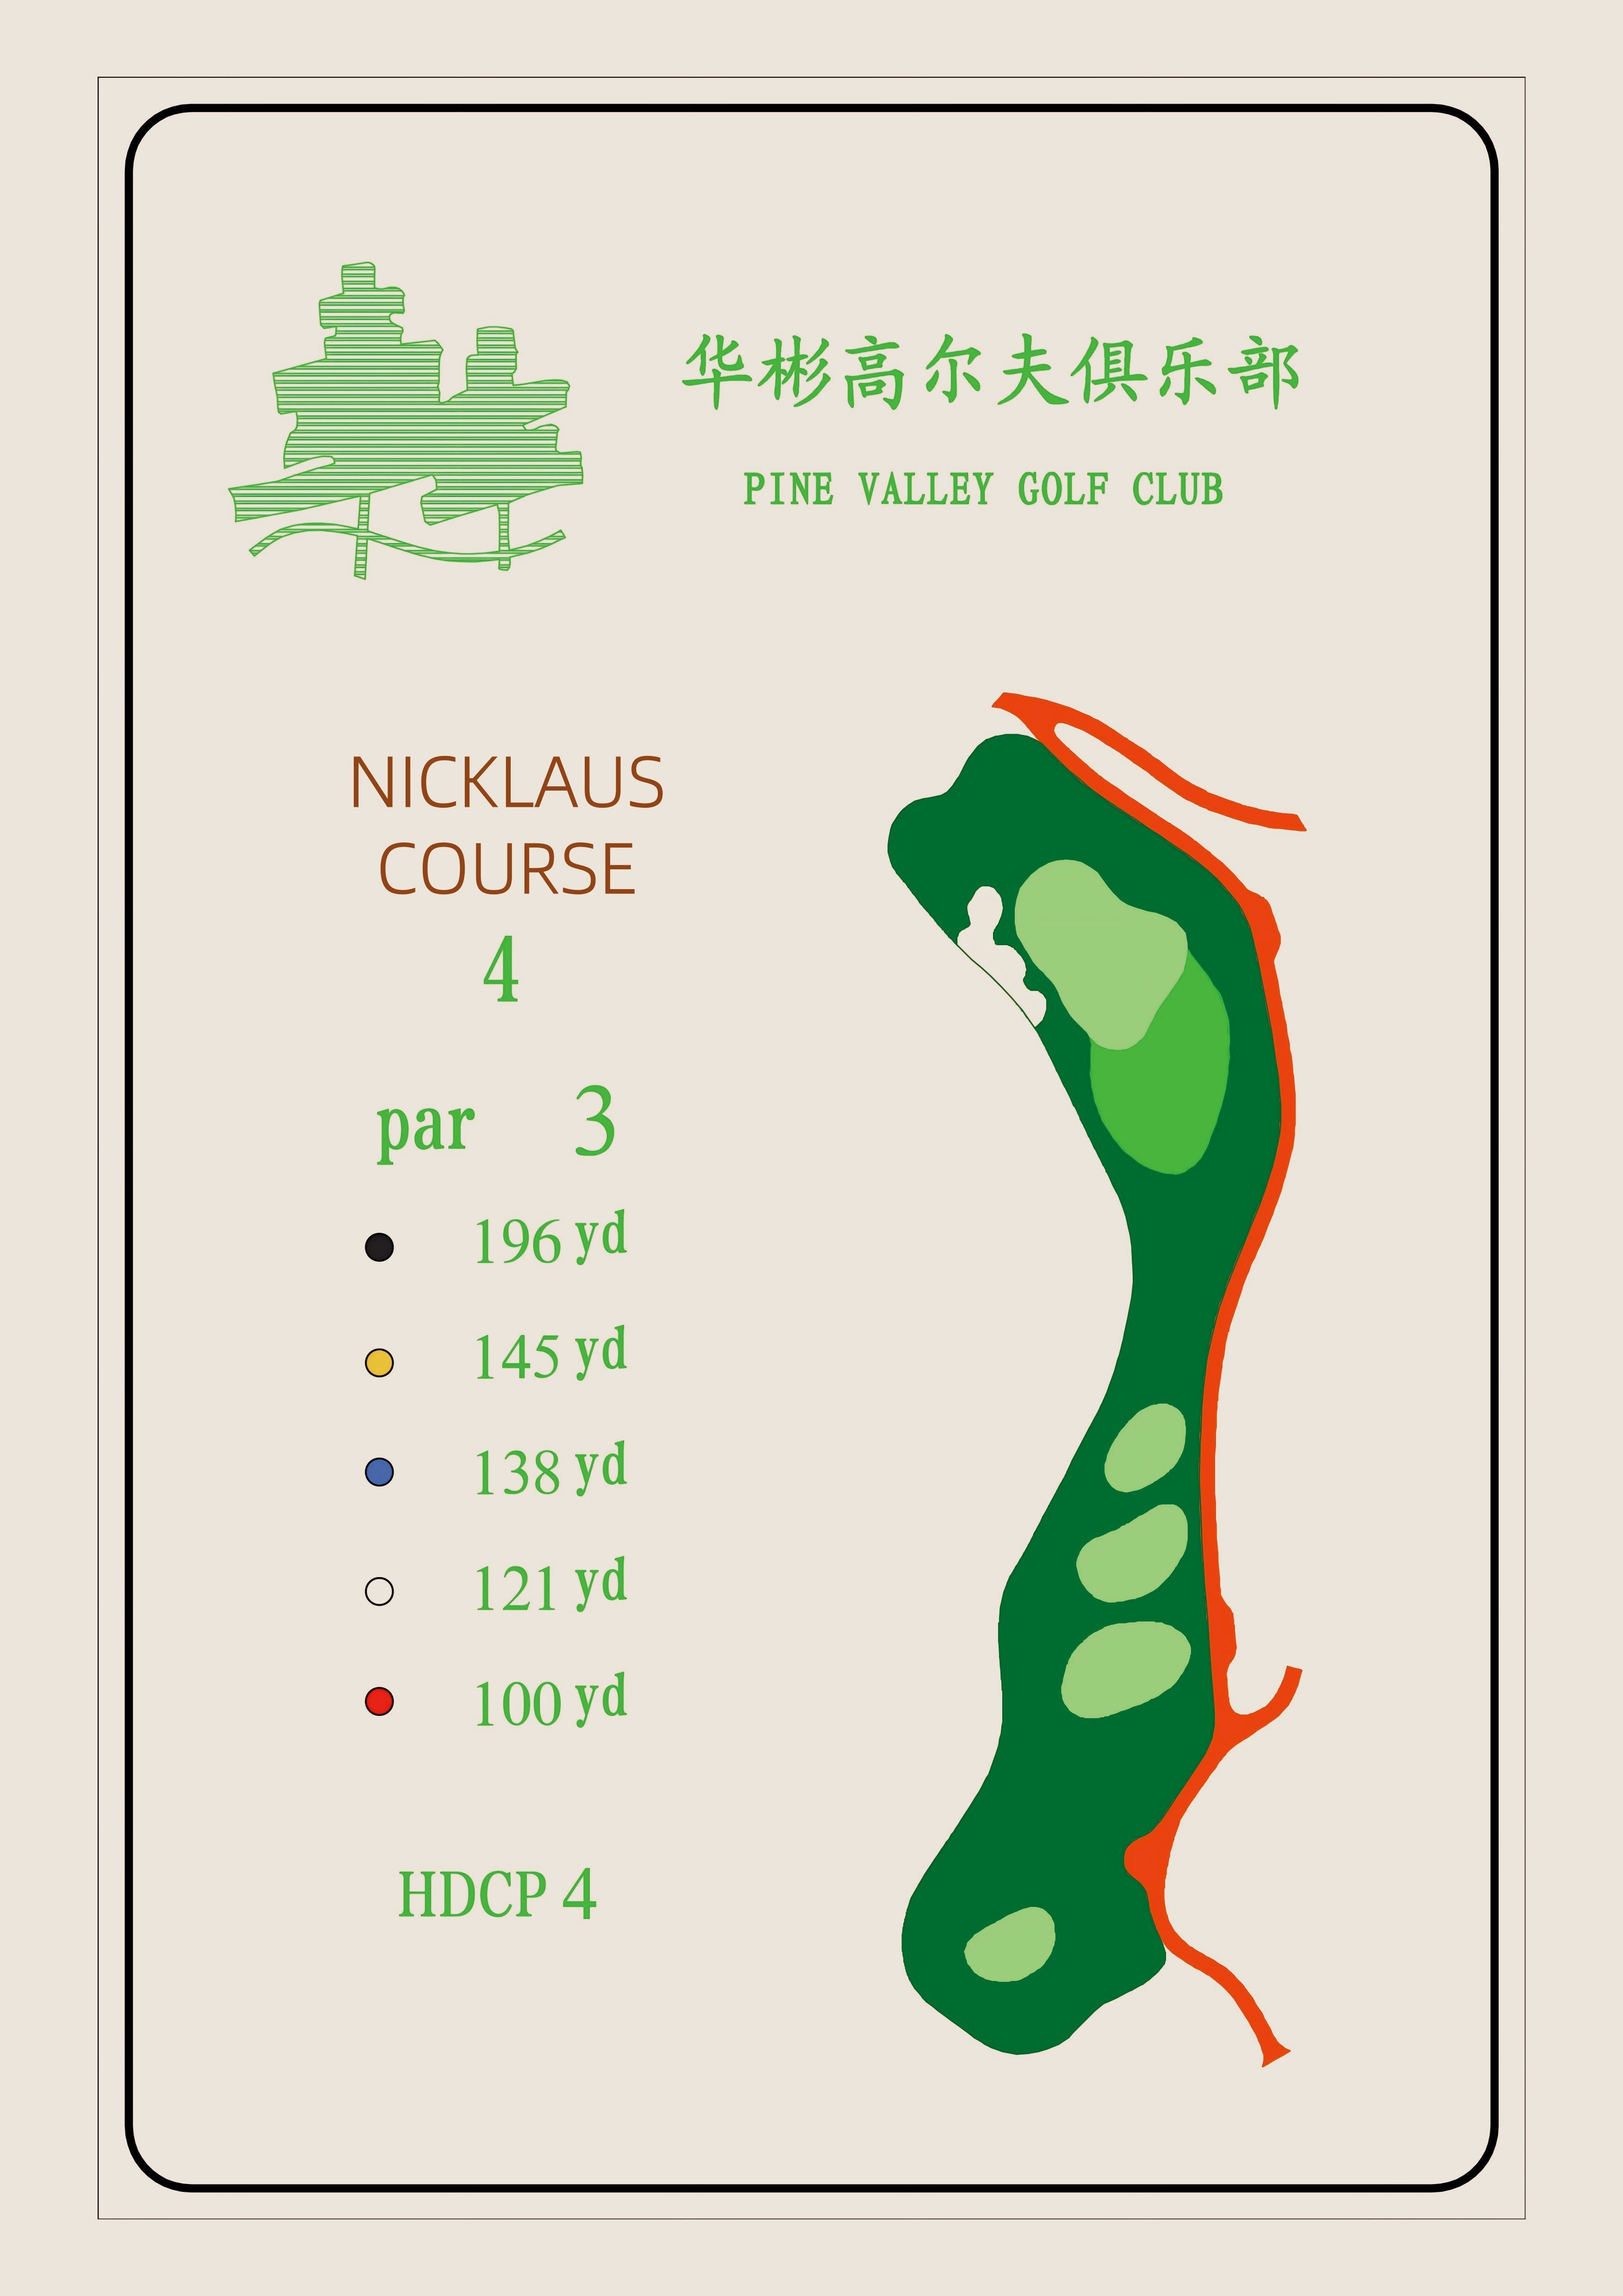
This is the shortest par 3 on the course, offering both danger and opportunity. There is a bunker in front left of the green, with water closely adjacent on the left. Aim right rather than left, and ensure your shot carries at least 180 yards.
This is the easiest par 4 on the course. A tee shot landing beyond 240 yards will avoid the right bunker, making a par highly likely. For a birdie opportunity, aim for a landing area around 280 yards, where the fairway is about 35 yards wide, leaving a wedge distance to the green.

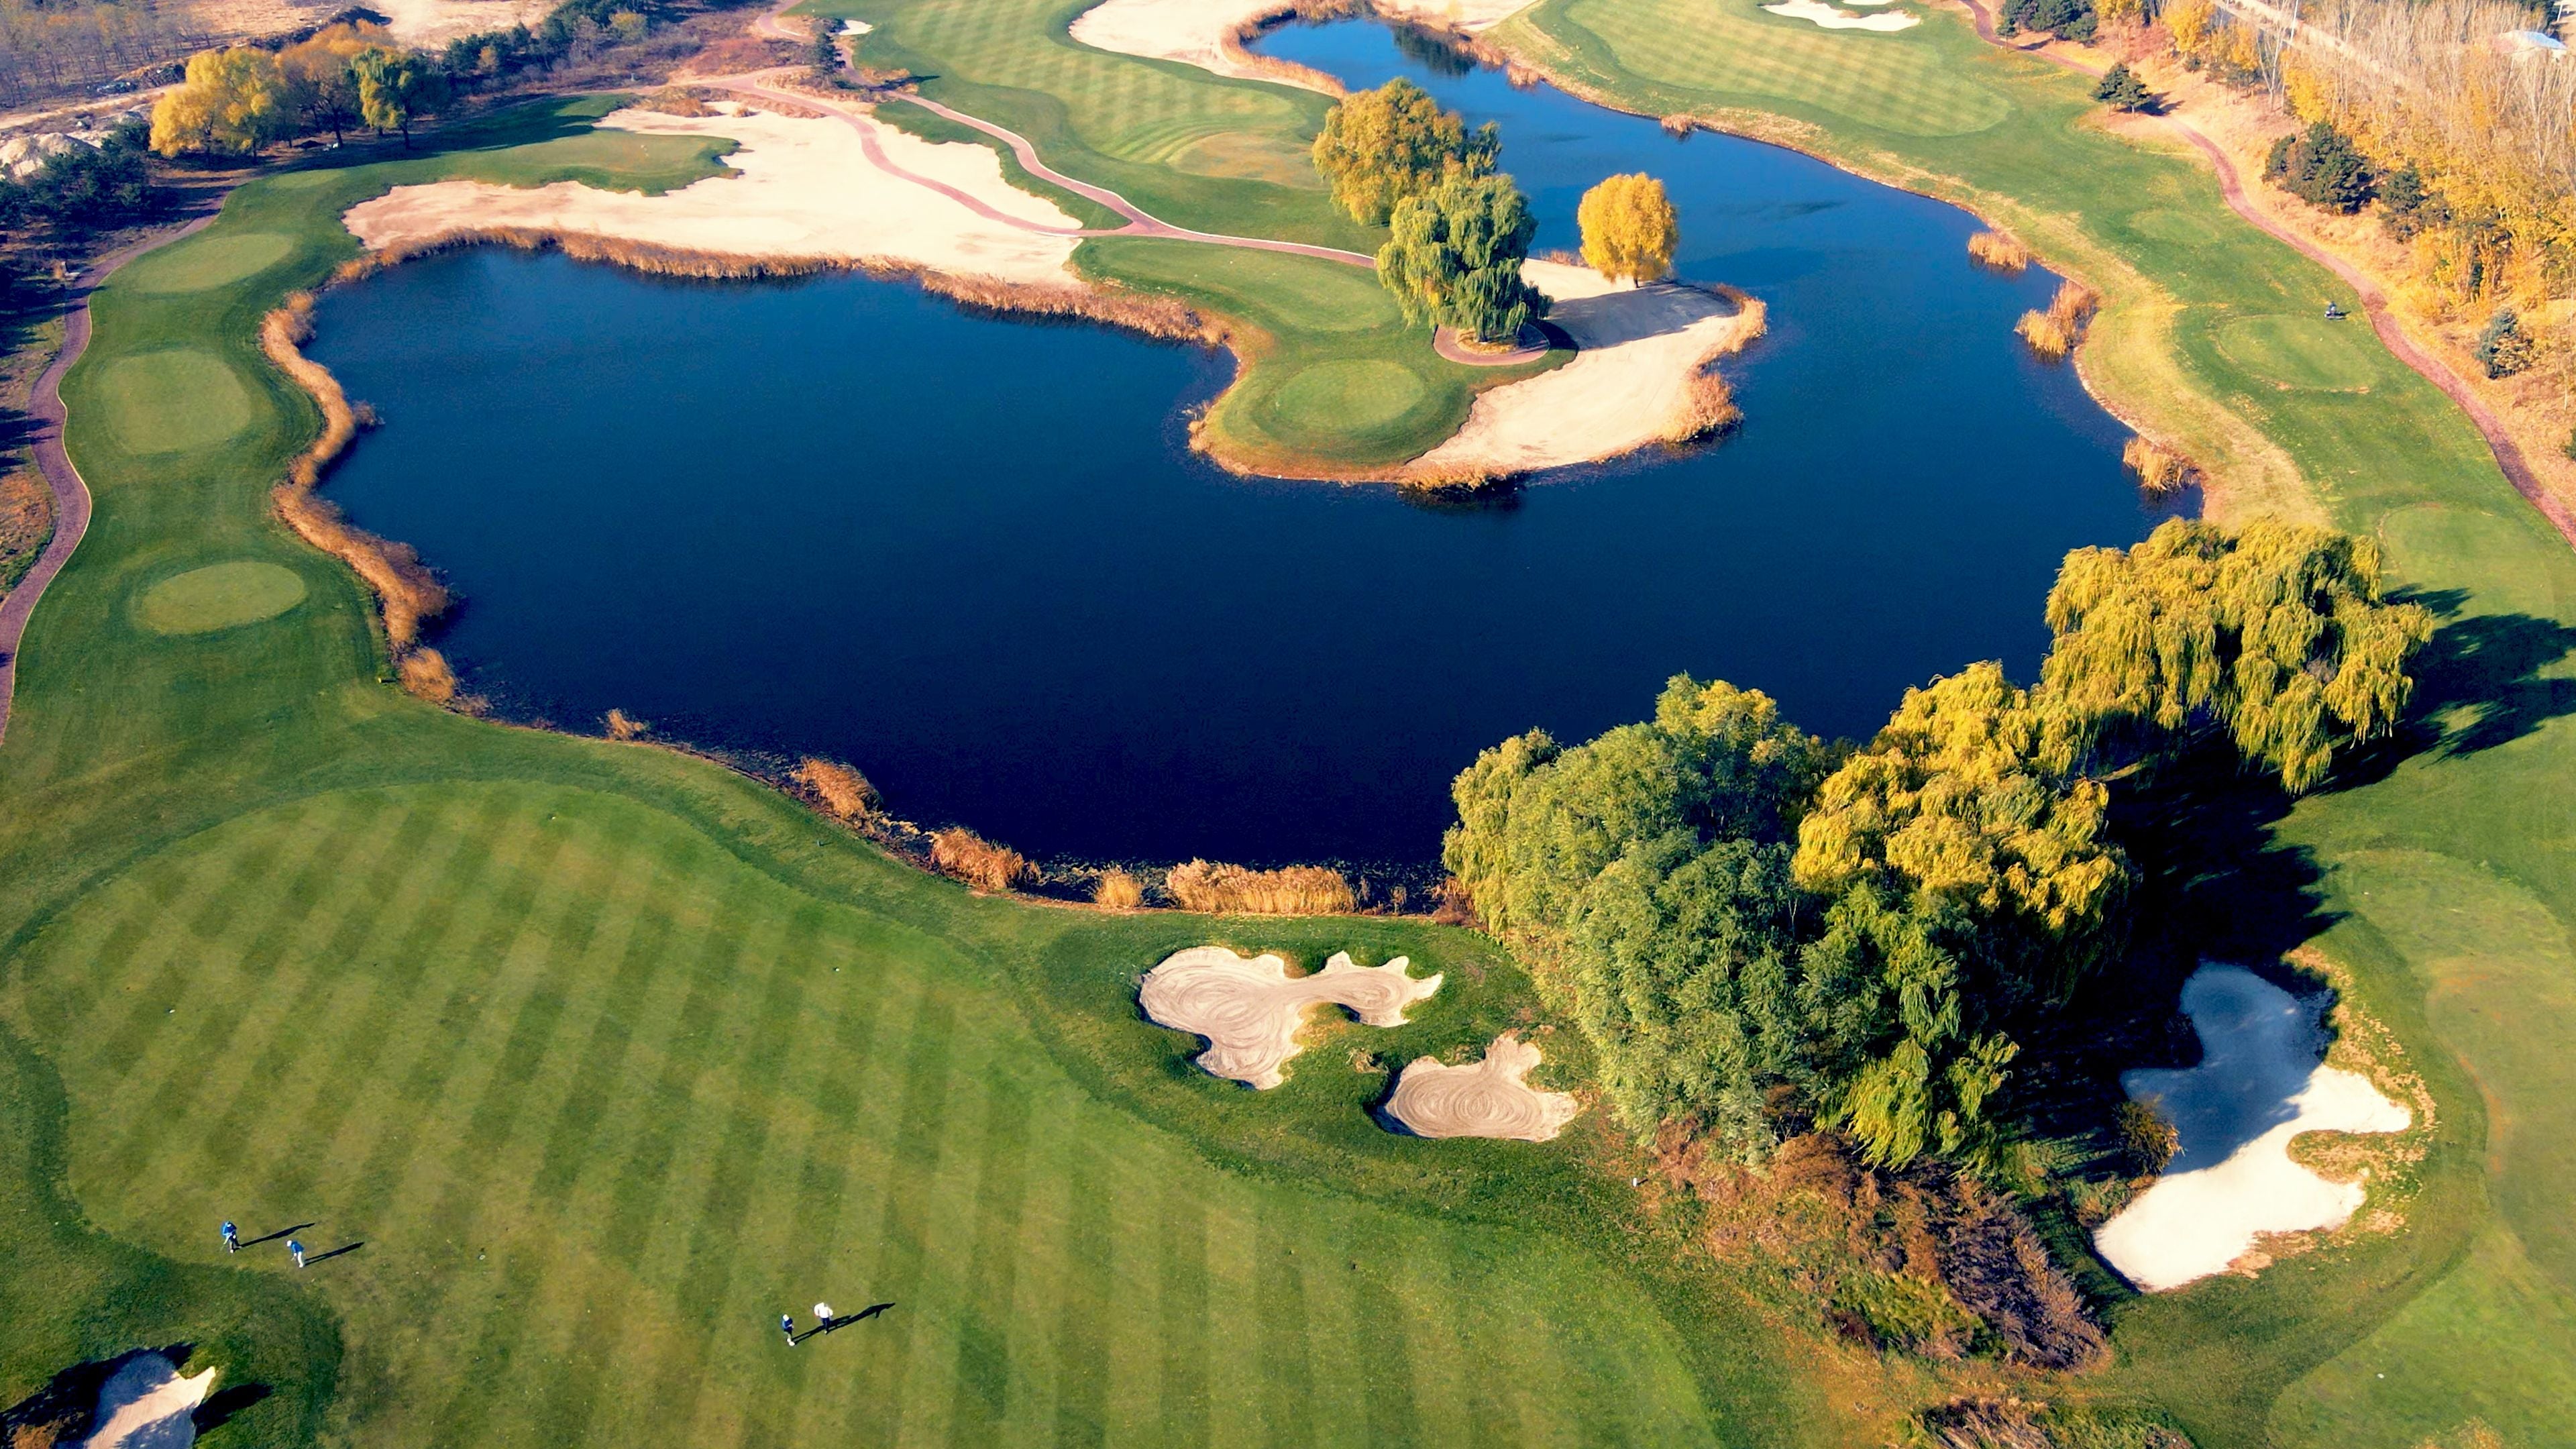
This is the most challenging hole on the front nine. The lake extending to the green on the right side adds significant pressure to both the tee shot and the approach. A driver may not be the best choice. The right bunker is 245 yards away, and the left bunker is 275 yards away. The fairway between the back of the right bunker and the front of the left bunker is about 30 yards wide. The best position for the approach is the fairway in front of the left bunker.
Although there is ample landing area in front of the green, this hole is tricky due to the elevated green. The distance from the tee to the front edge of the green is about 215 yards. Depending on the pin position, decide whether to aim long or short, ensuring the ball lands on the green.
The fairway appears wide, but it narrows significantly at 270 yards, with a width of only about 40 yards due to bunkers on both sides. Avoid hitting too hard; keeping the ball in the middle of the fairway is key. However, if you are a long hitter and can land the ball beyond 295 yards, the fairway widens to about 50-55 yards. The green slopes from left to right and back to front. Avoid the front-left bunker; the right-front side of the green is a good landing area.
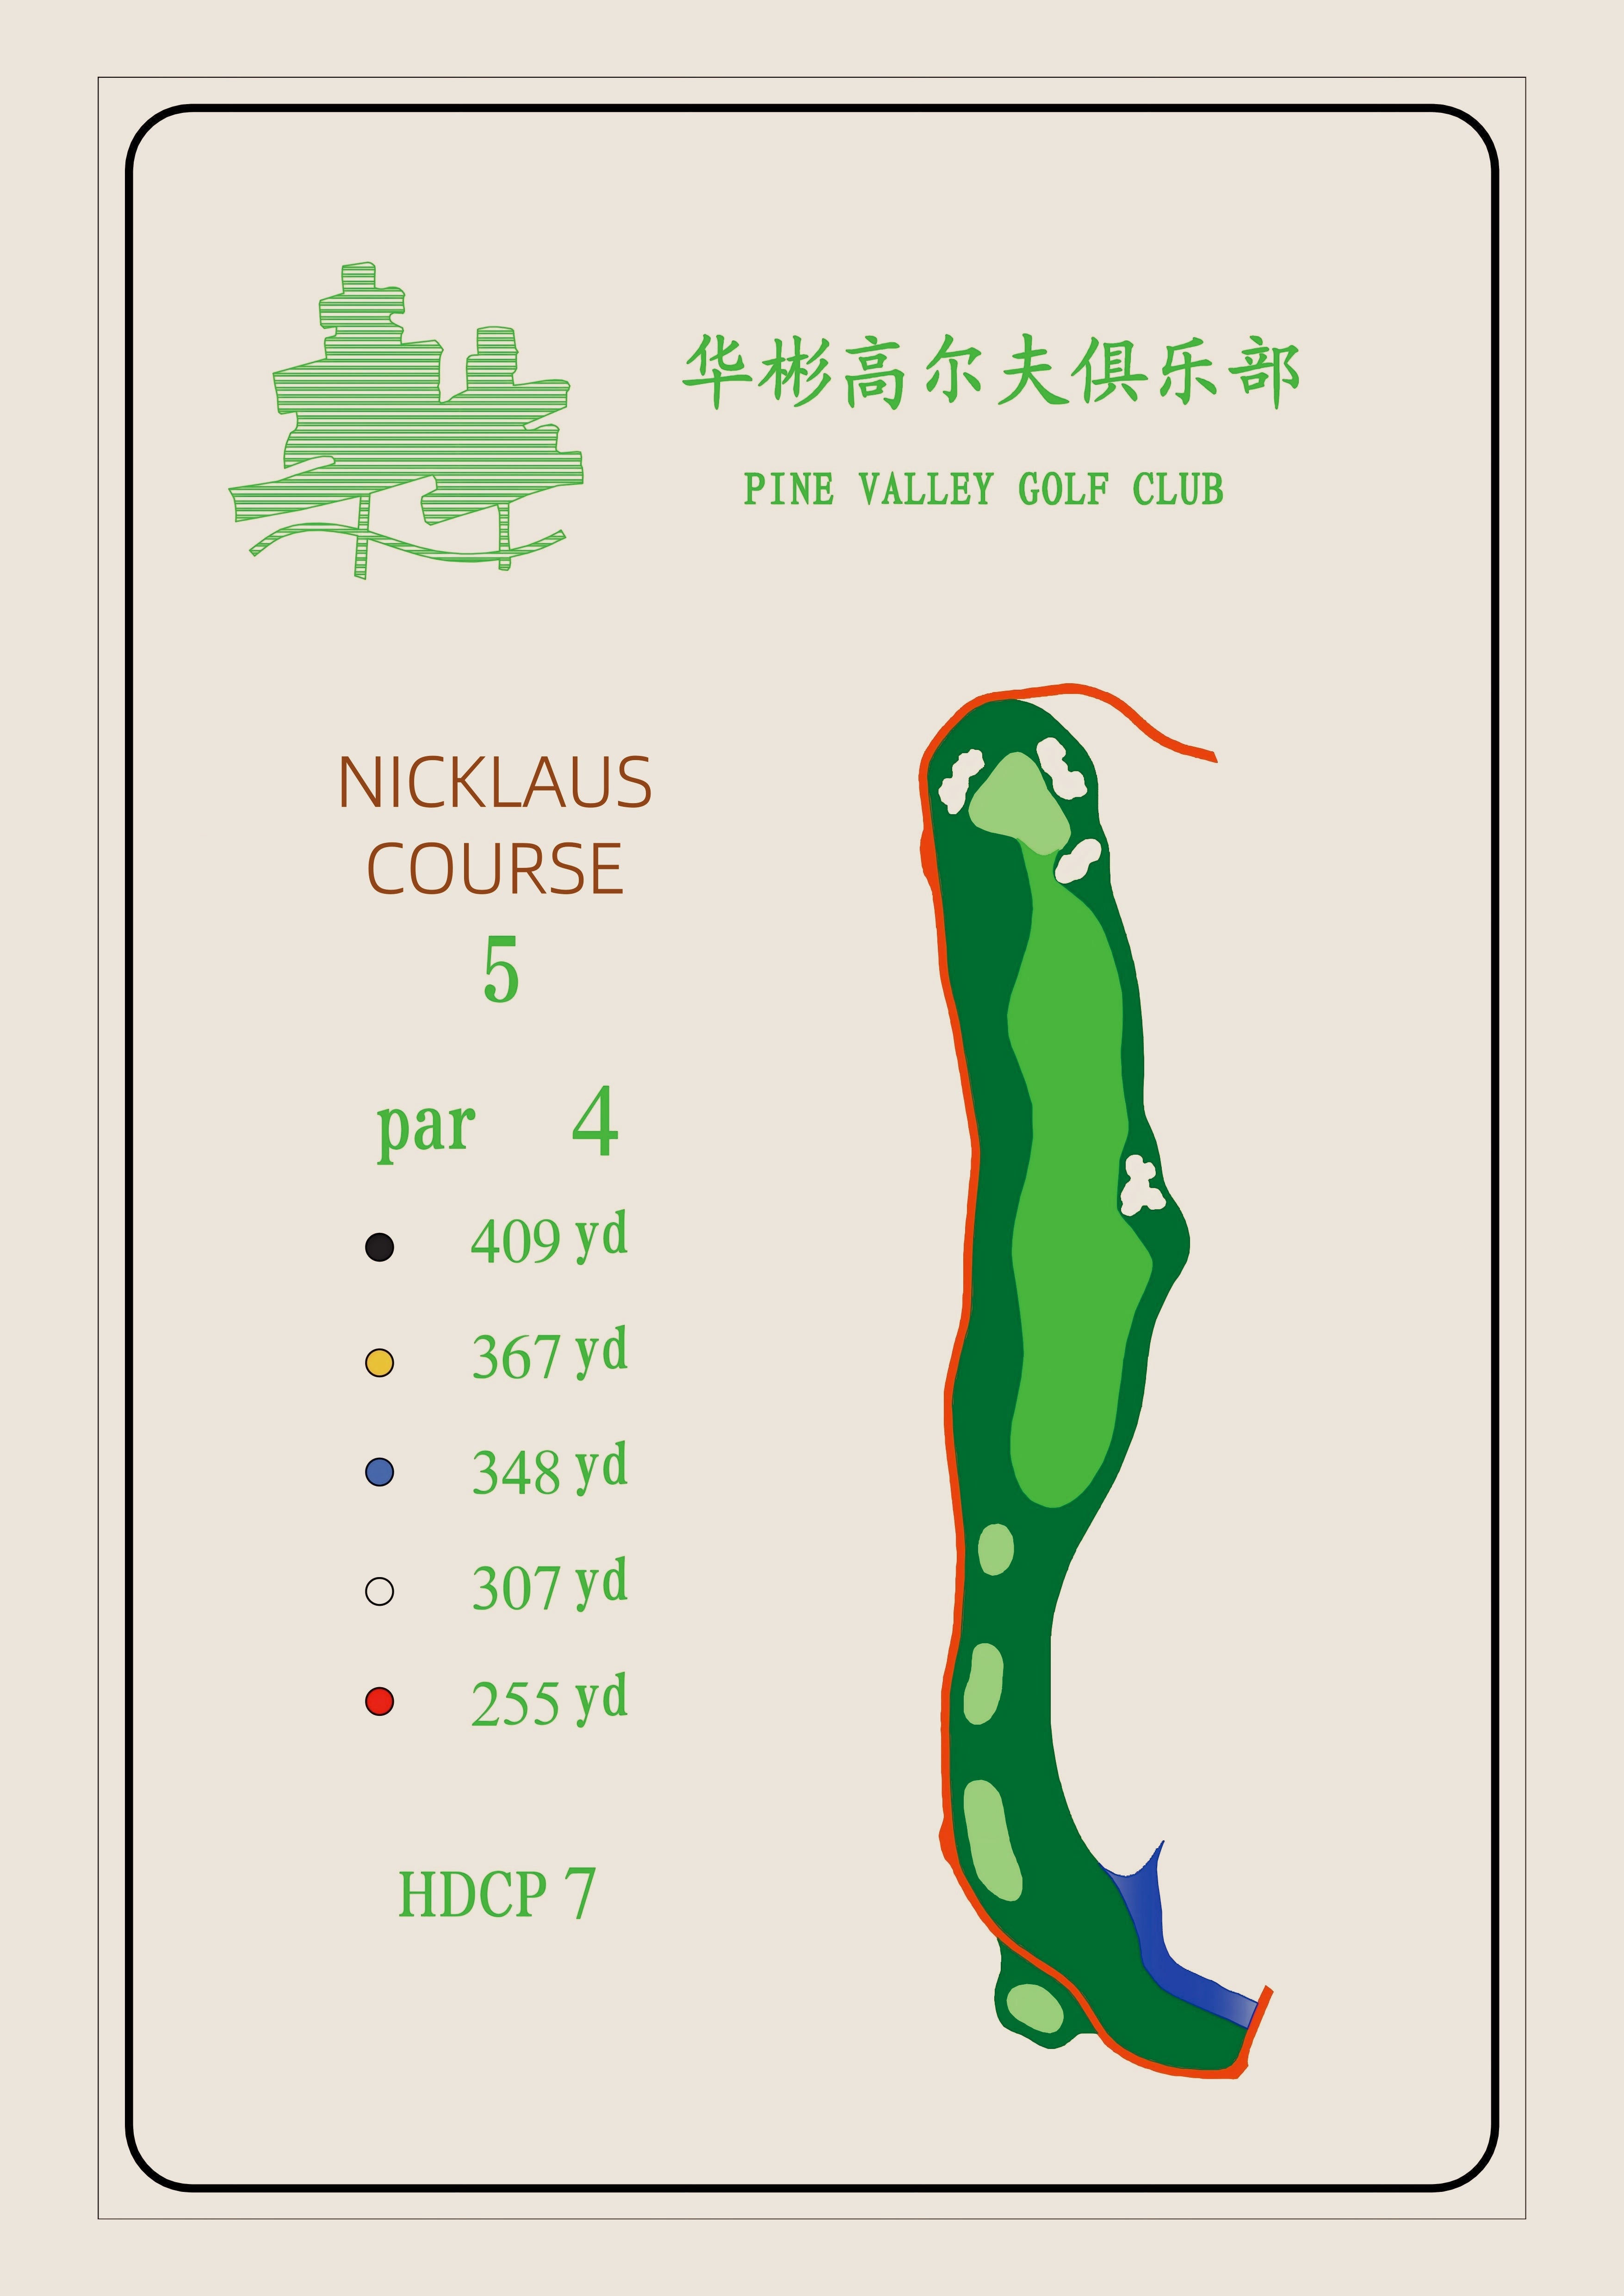
This is a relatively short par 5 with a lake extending along the left side to the green. Pay attention to the tall pine tree in the middle, approximately 280-290 yards from the tee. Choose your landing spot carefully to avoid being blocked by the tree on your second shot. If you are confident with your driver, aim left of the pine tree. The fairway between the tree and the water hazard is 40 yards wide, giving you a chance to reach the green in two.
The first hole is quite friendly, starting from the gold tee. It is a relatively short par 4 with no obstacles off the tee, so aim for the center of the fairway. However, precision is crucial when approaching the green, especially in terms of left-right accuracy. Aim left rather than right, as the bunker on the right is very deep. Try to secure your first par. There is a landing area behind the green, so if you overshoot, you can chip back.
This is a slight left dogleg par 4. The landing area before the right bunker is about 290 yards away, with a fairway width of approximately 50-60 yards. Players who excel at hitting a draw can aim for the left edge of the right bunker. Those who prefer a fade can aim left of the fairway but should avoid over-fading into the right bunker. When approaching the green, aim right rather than left, as there is a landing area on the right side of the green. Also, ensure your shot carries enough distance to clear the front hazards.
The landing area for the tee shot is 250 yards, clearing all the front bunkers. Beyond the bunkers, the fairway slopes downhill, likely resulting in a downhill lie with the left foot lower than the right. The second shot needs to clear the right-side bunker in the middle. Instead of blindly using a 3-wood, a higher-lofted hybrid might be a better choice. Long hitters can aim for a landing area between 290-310 yards, where the fairway is about 60 yards wide. The second shot to the green is approximately 240-250 yards, making it possible to reach in two.
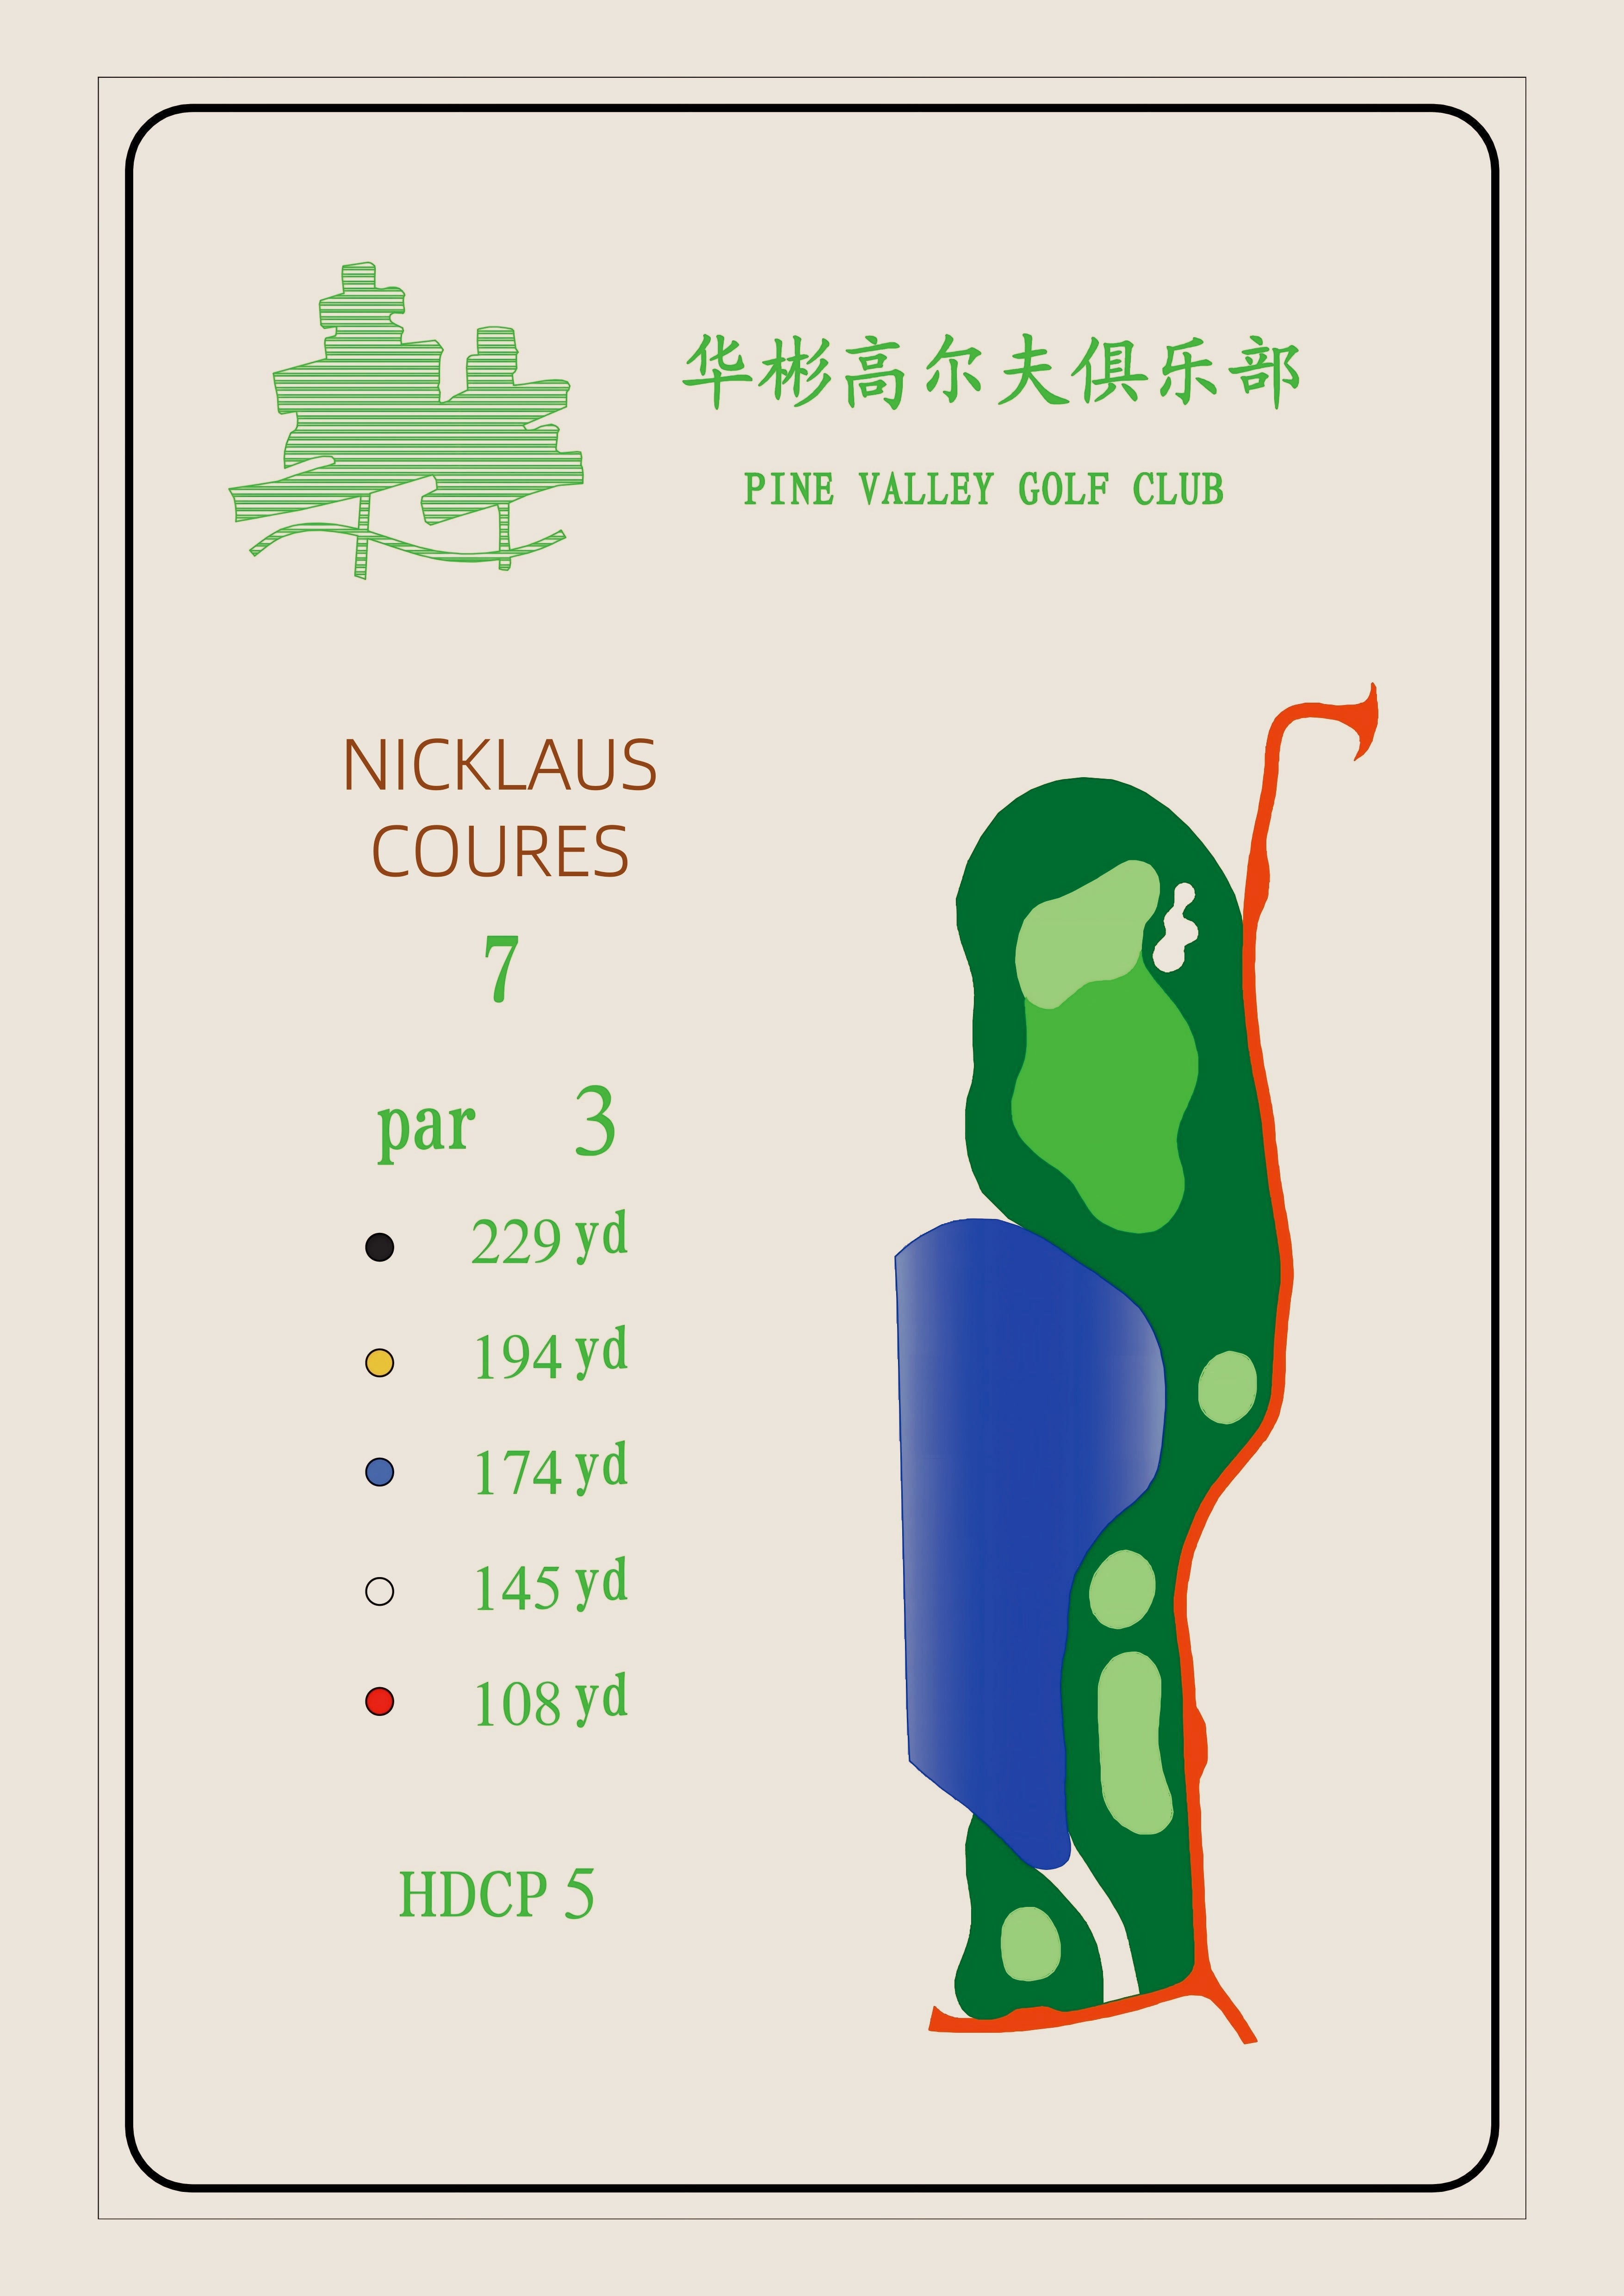
This is the shortest par 3 on the course, offering both danger and opportunity. There is a bunker in front left of the green, with water closely adjacent on the left. Aim right rather than left, and ensure your shot carries at least 180 yards.
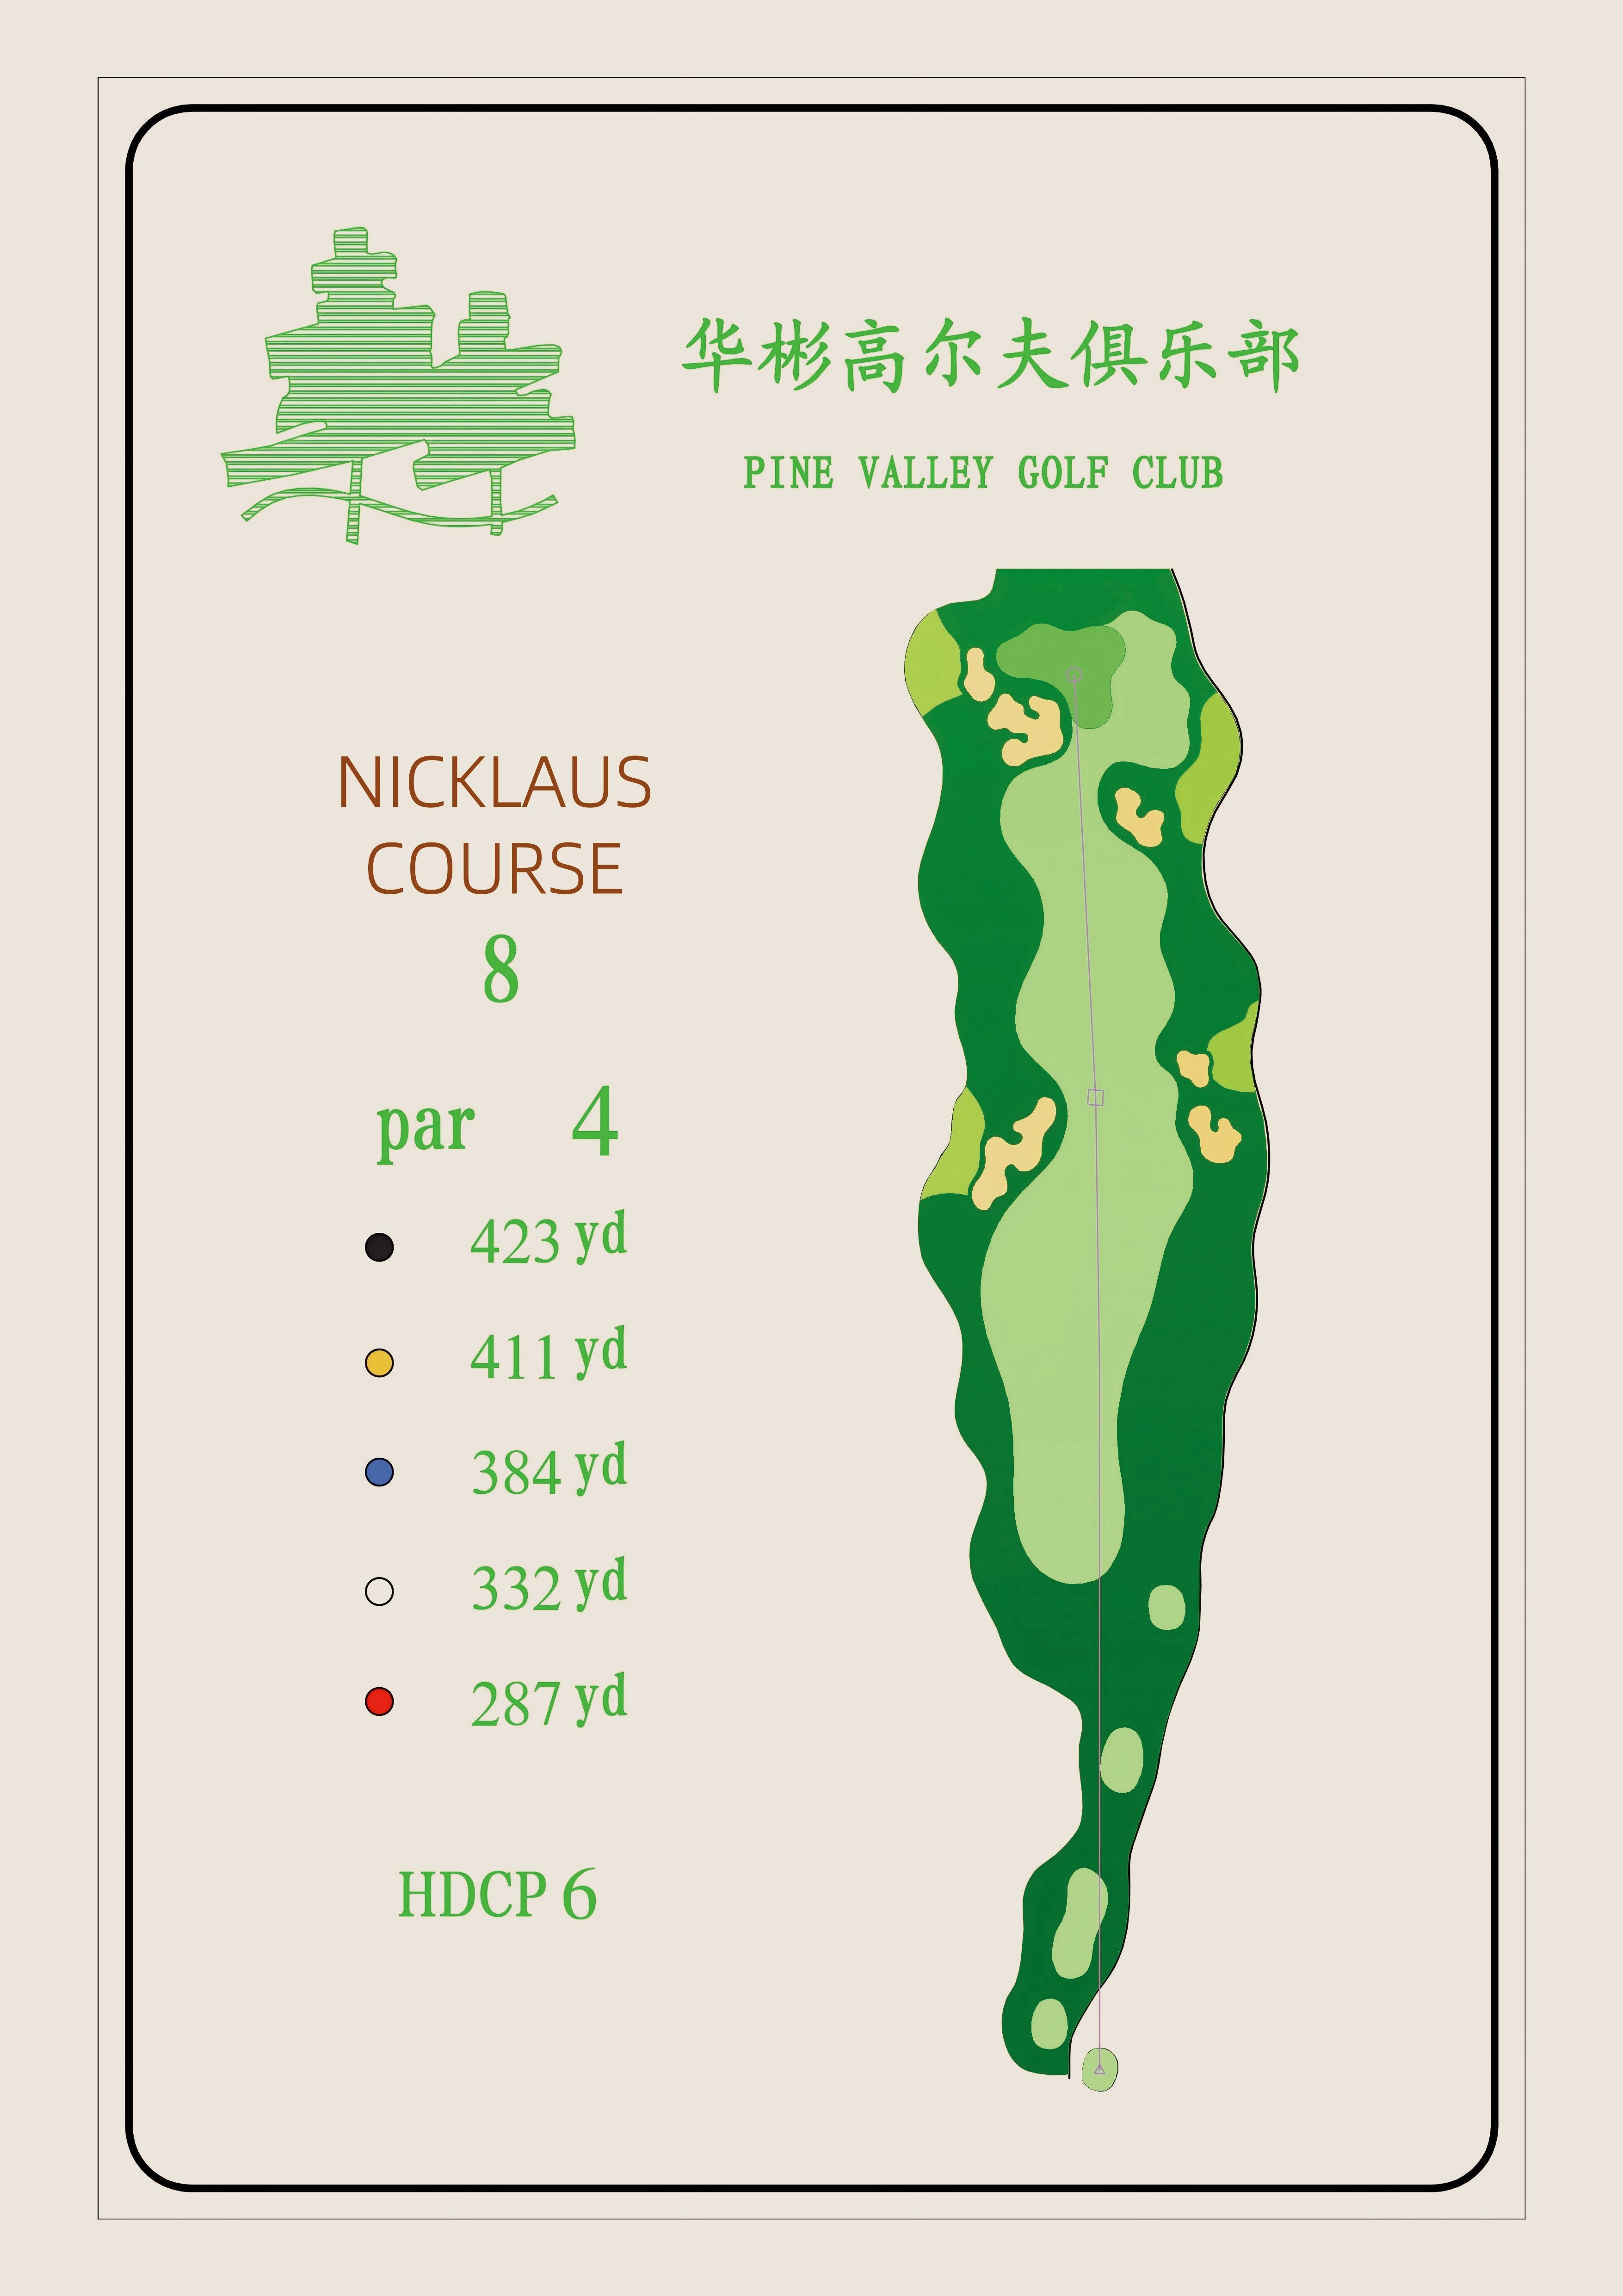
This is the easiest par 4 on the course. A tee shot landing beyond 240 yards will avoid the right bunker, making a par highly likely. For a birdie opportunity, aim for a landing area around 280 yards, where the fairway is about 35 yards wide, leaving a wedge distance to the green.
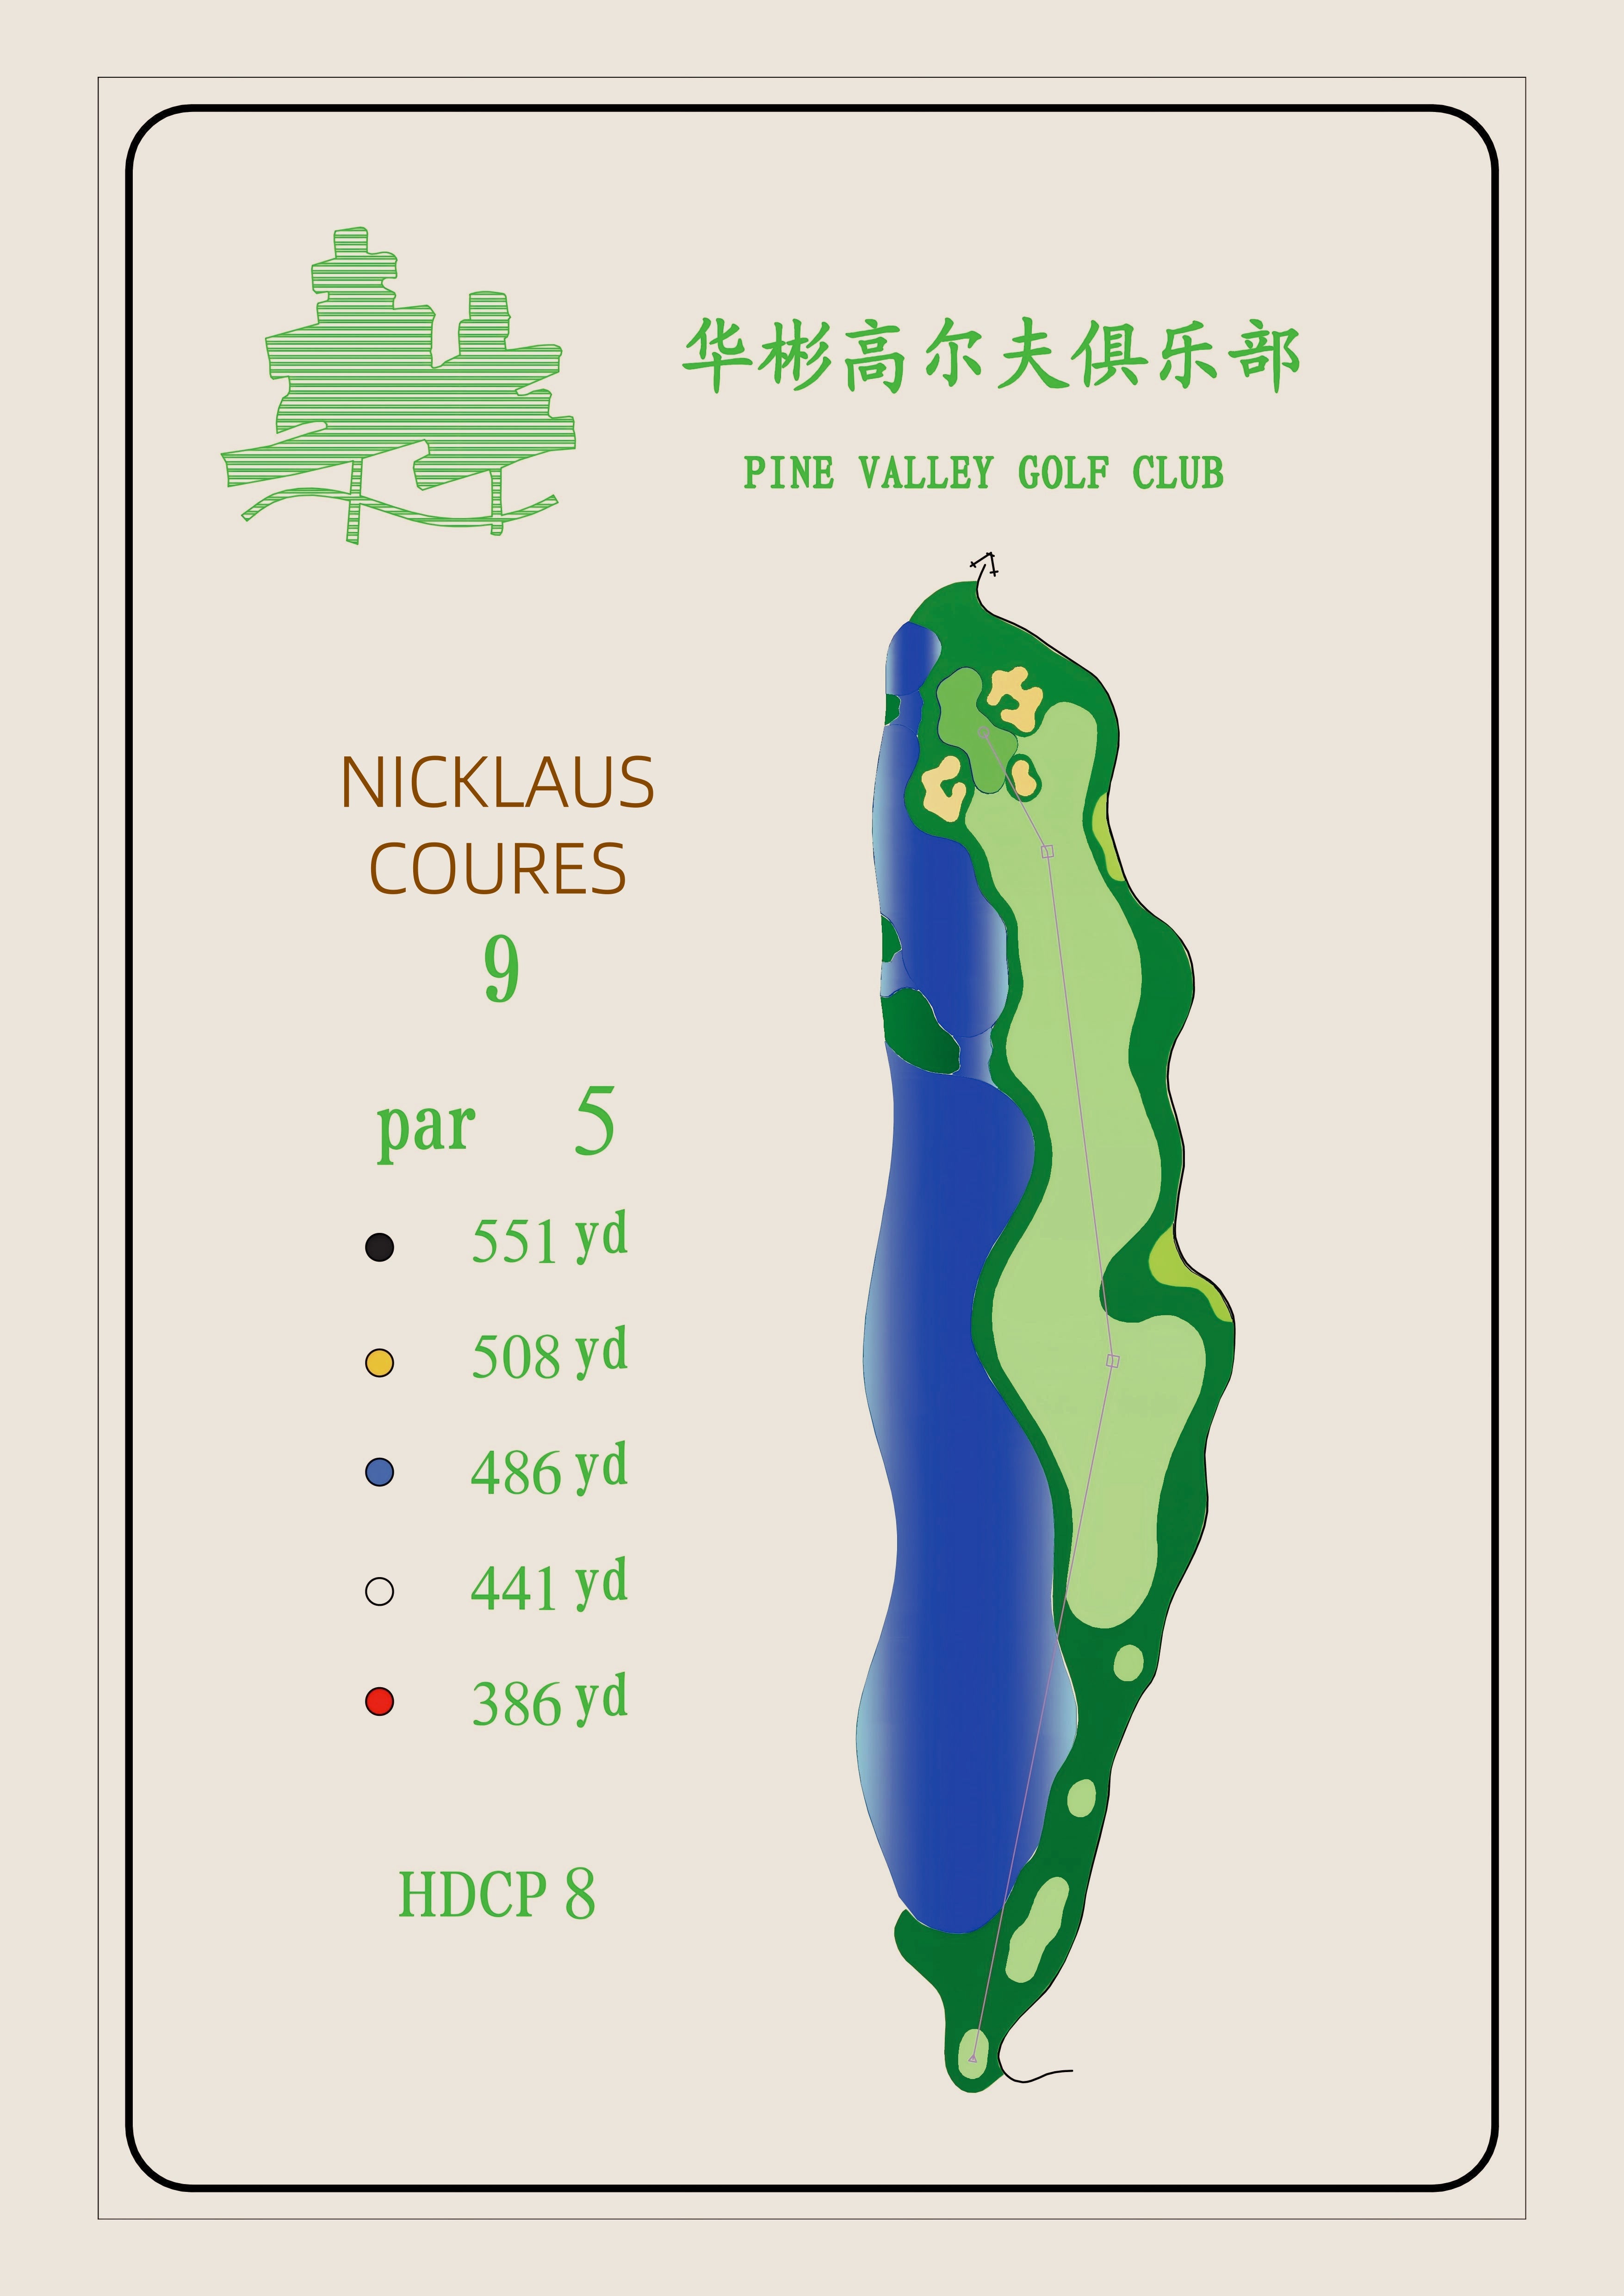
This is the most challenging hole on the front nine. The lake extending to the green on the right side adds significant pressure to both the tee shot and the approach. A driver may not be the best choice. The right bunker is 245 yards away, and the left bunker is 275 yards away. The fairway between the back of the right bunker and the front of the left bunker is about 30 yards wide. The best position for the approach is the fairway in front of the left bunker.
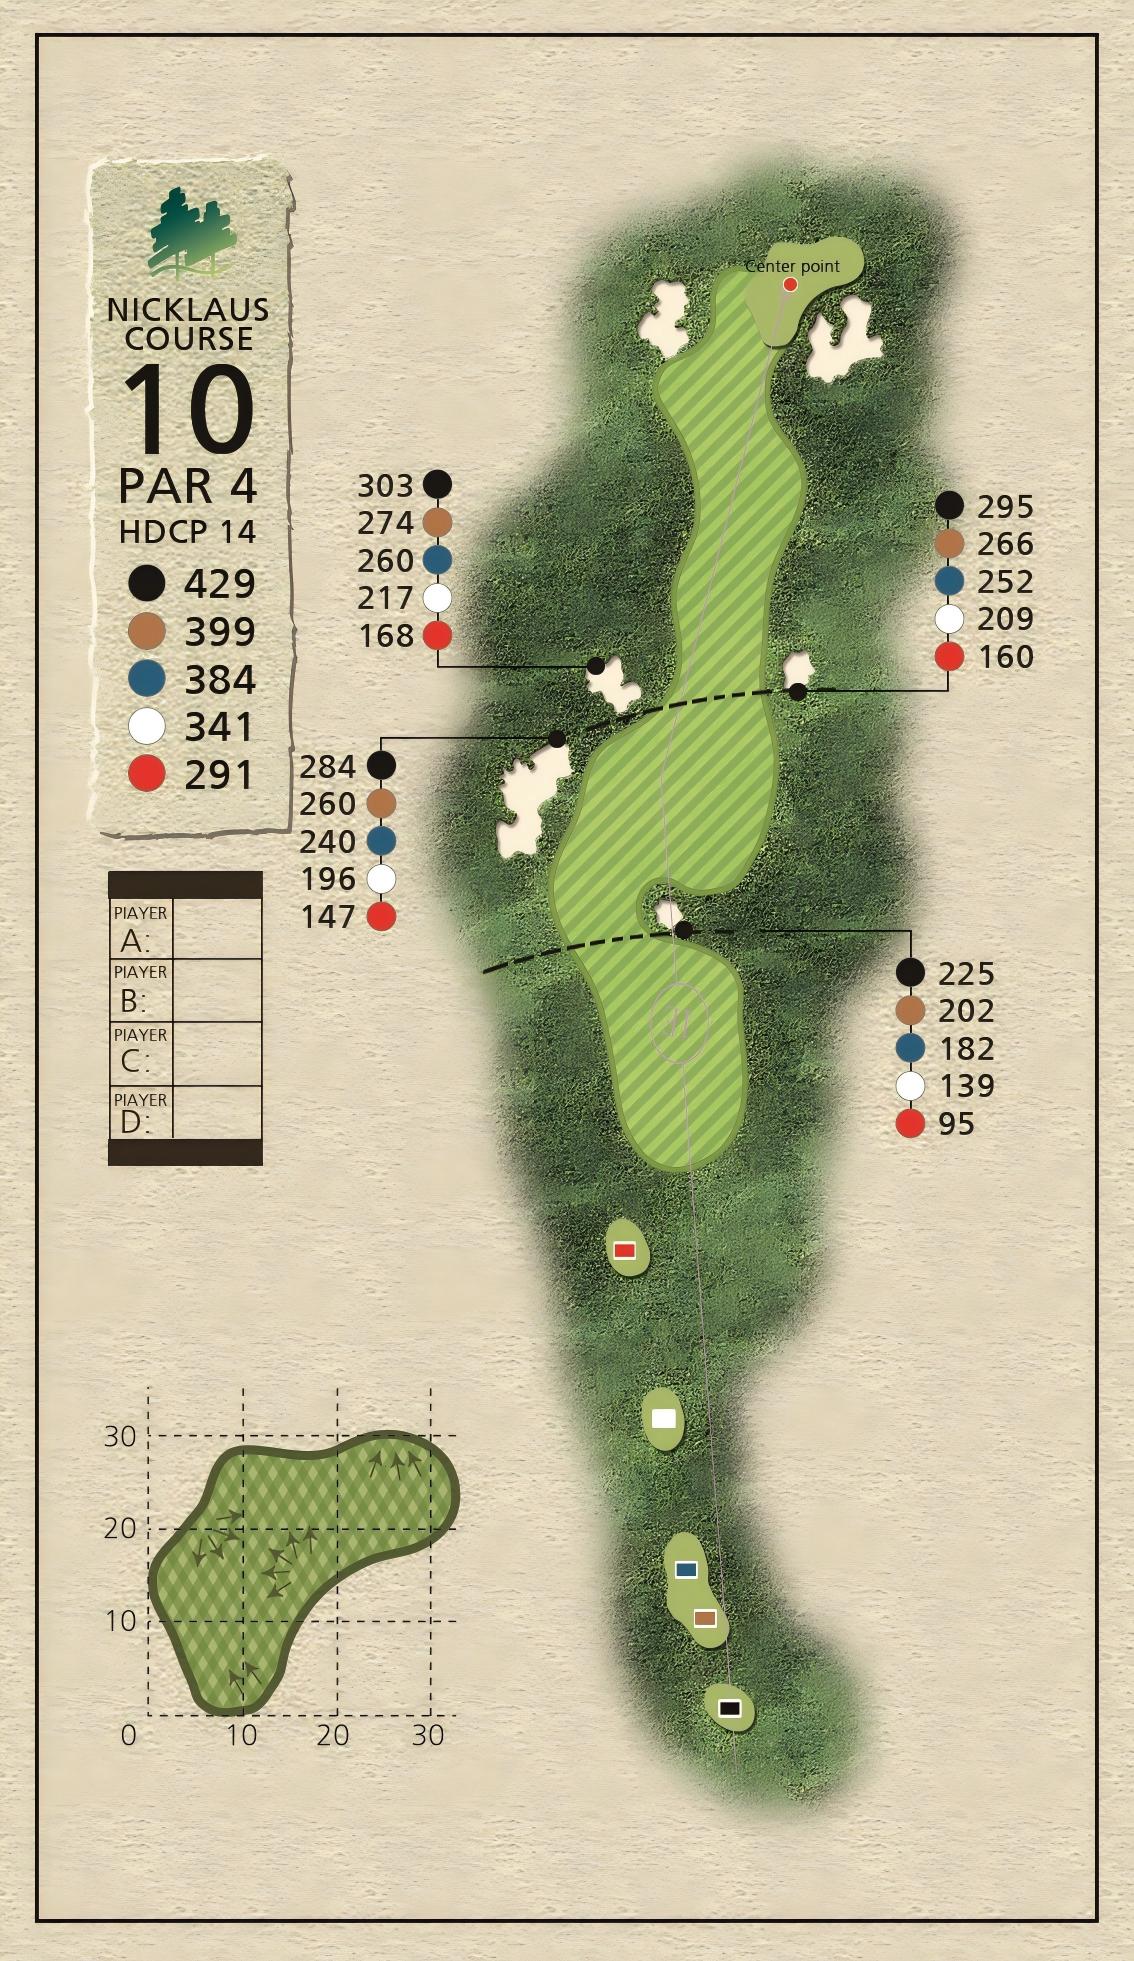
Although there is ample landing area in front of the green, this hole is tricky due to the elevated green. The distance from the tee to the front edge of the green is about 215 yards. Depending on the pin position, decide whether to aim long or short, ensuring the ball lands on the green.
The fairway appears wide, but it narrows significantly at 270 yards, with a width of only about 40 yards due to bunkers on both sides. Avoid hitting too hard; keeping the ball in the middle of the fairway is key. However, if you are a long hitter and can land the ball beyond 295 yards, the fairway widens to about 50-55 yards. The green slopes from left to right and back to front. Avoid the front-left bunker; the right-front side of the green is a good landing area.
This is a relatively short par 5 with a lake extending along the left side to the green. Pay attention to the tall pine tree in the middle, approximately 280-290 yards from the tee. Choose your landing spot carefully to avoid being blocked by the tree on your second shot. If you are confident with your driver, aim left of the pine tree. The fairway between the tree and the water hazard is 40 yards wide, giving you a chance to reach the green in two.
This hole features a relatively flat fairway. A 250-yard drive will clear the bunker in the middle of the fairway. For your second shot, avoid the bunker on the right side of the green. Do not overly pursue the pin position; if the risk is too high, consider the front-left area of the green as the best landing spot.
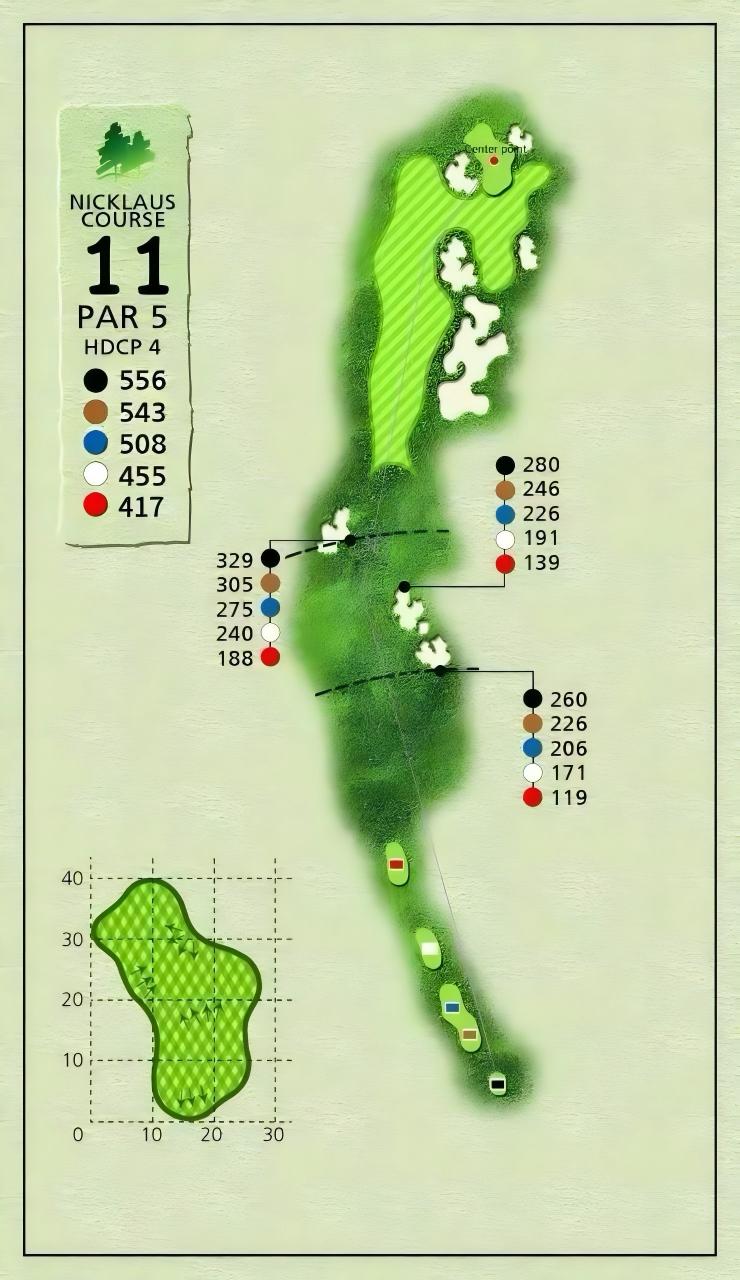
This is a cleverly designed par 5. Without an exceptionally long drive, reaching the green in two is unlikely. Pay attention to the landing area for your second shot, aiming for the left side of the fairway. Ask your caddie for the distance to the middle bunker, leaving yourself 100-130 yards for the best approach to the green. If your drive exceeds 310 yards, you can clear the right bunker and land on the right side of the fairway. For your second shot, consider using a long club to clear the bunker and attack the green. Even if you come up short, landing on the right side of the fairway will give you a better angle for a chip shot.
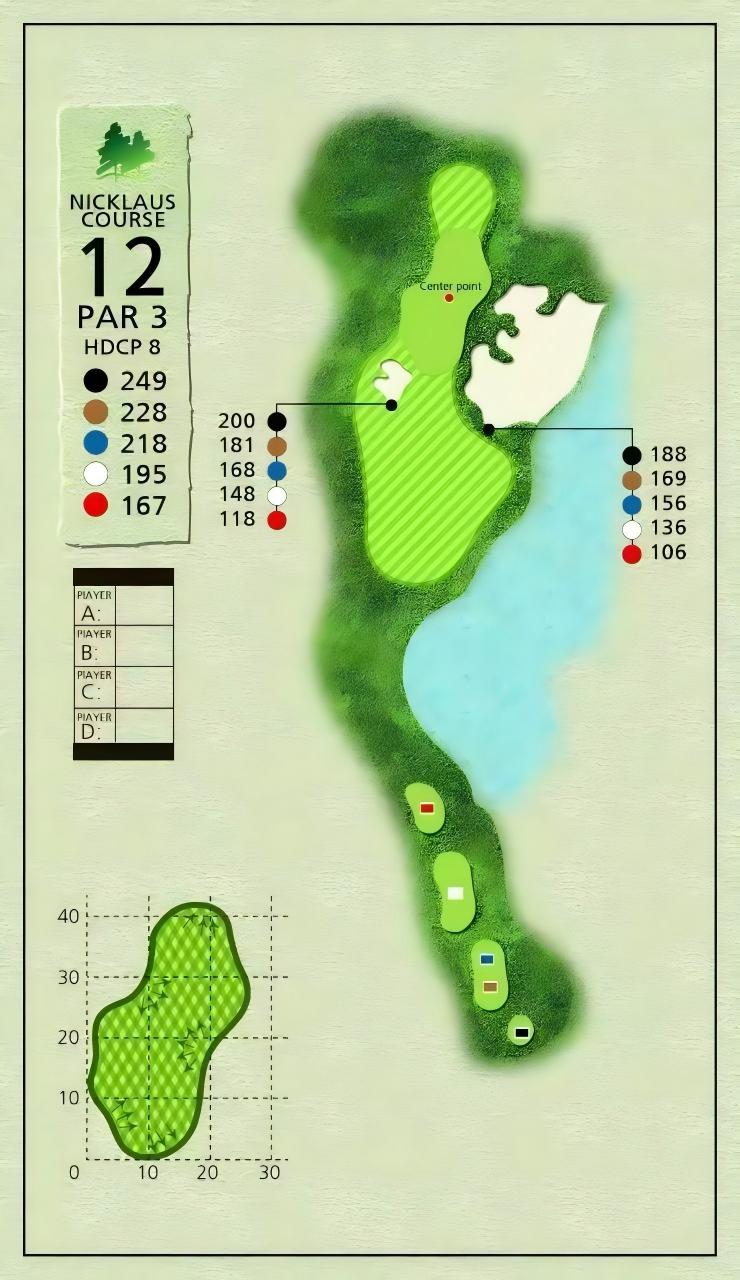
This is an exceptionally long par 3. Avoid the bunker on the right side and ensure your shot carries at least 225 yards to clear the front-left bunker. Regardless of the pin position, aim for the bunker direction, preferring to overshoot rather than come up short.
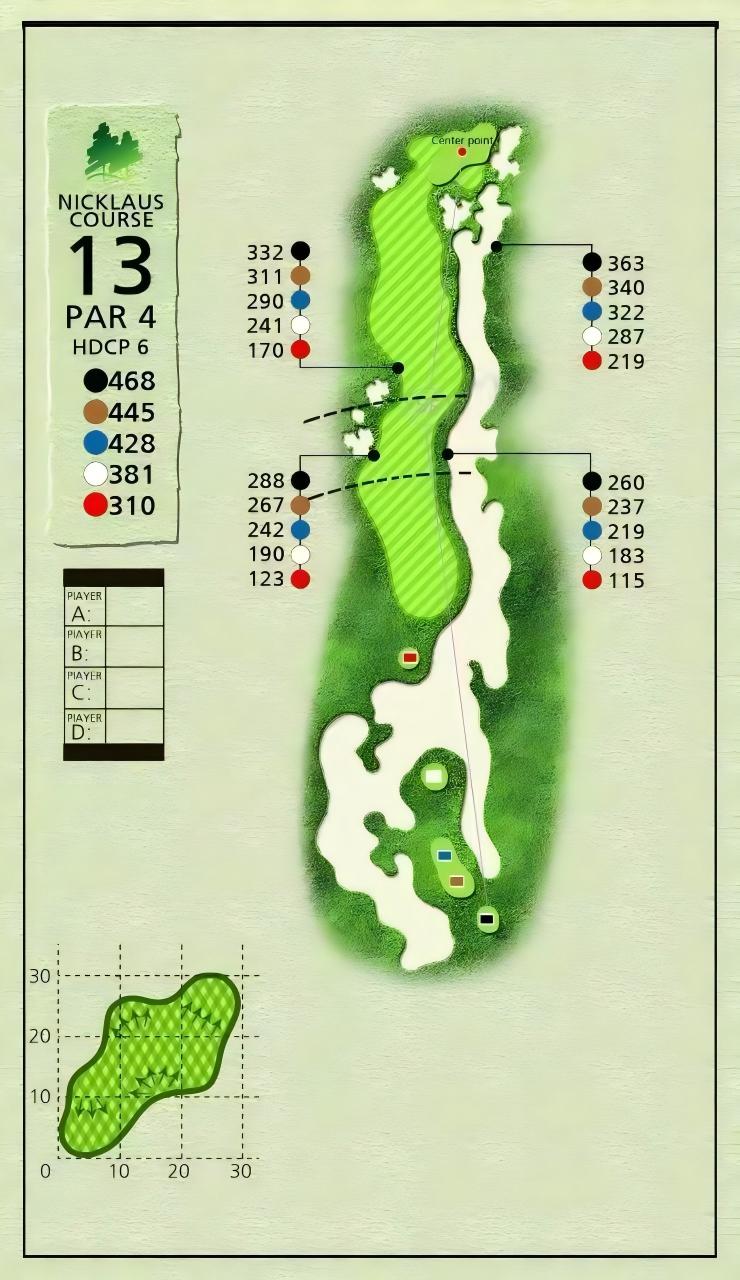
This is a challenging par 4. The landing area around 290 yards is narrow, with only about 40 yards of fairway between the bunkers. Avoid the bunkers on the right side of the fairway. Consider landing your drive around 270 yards, where the fairway is about 50 yards wide. The second shot to the flat green requires precise distance control. The front bunker is the most likely to catch your ball, so ask your caddie for the exact distance to clear it. The back-left area of the green is more spacious, providing a safer landing spot.
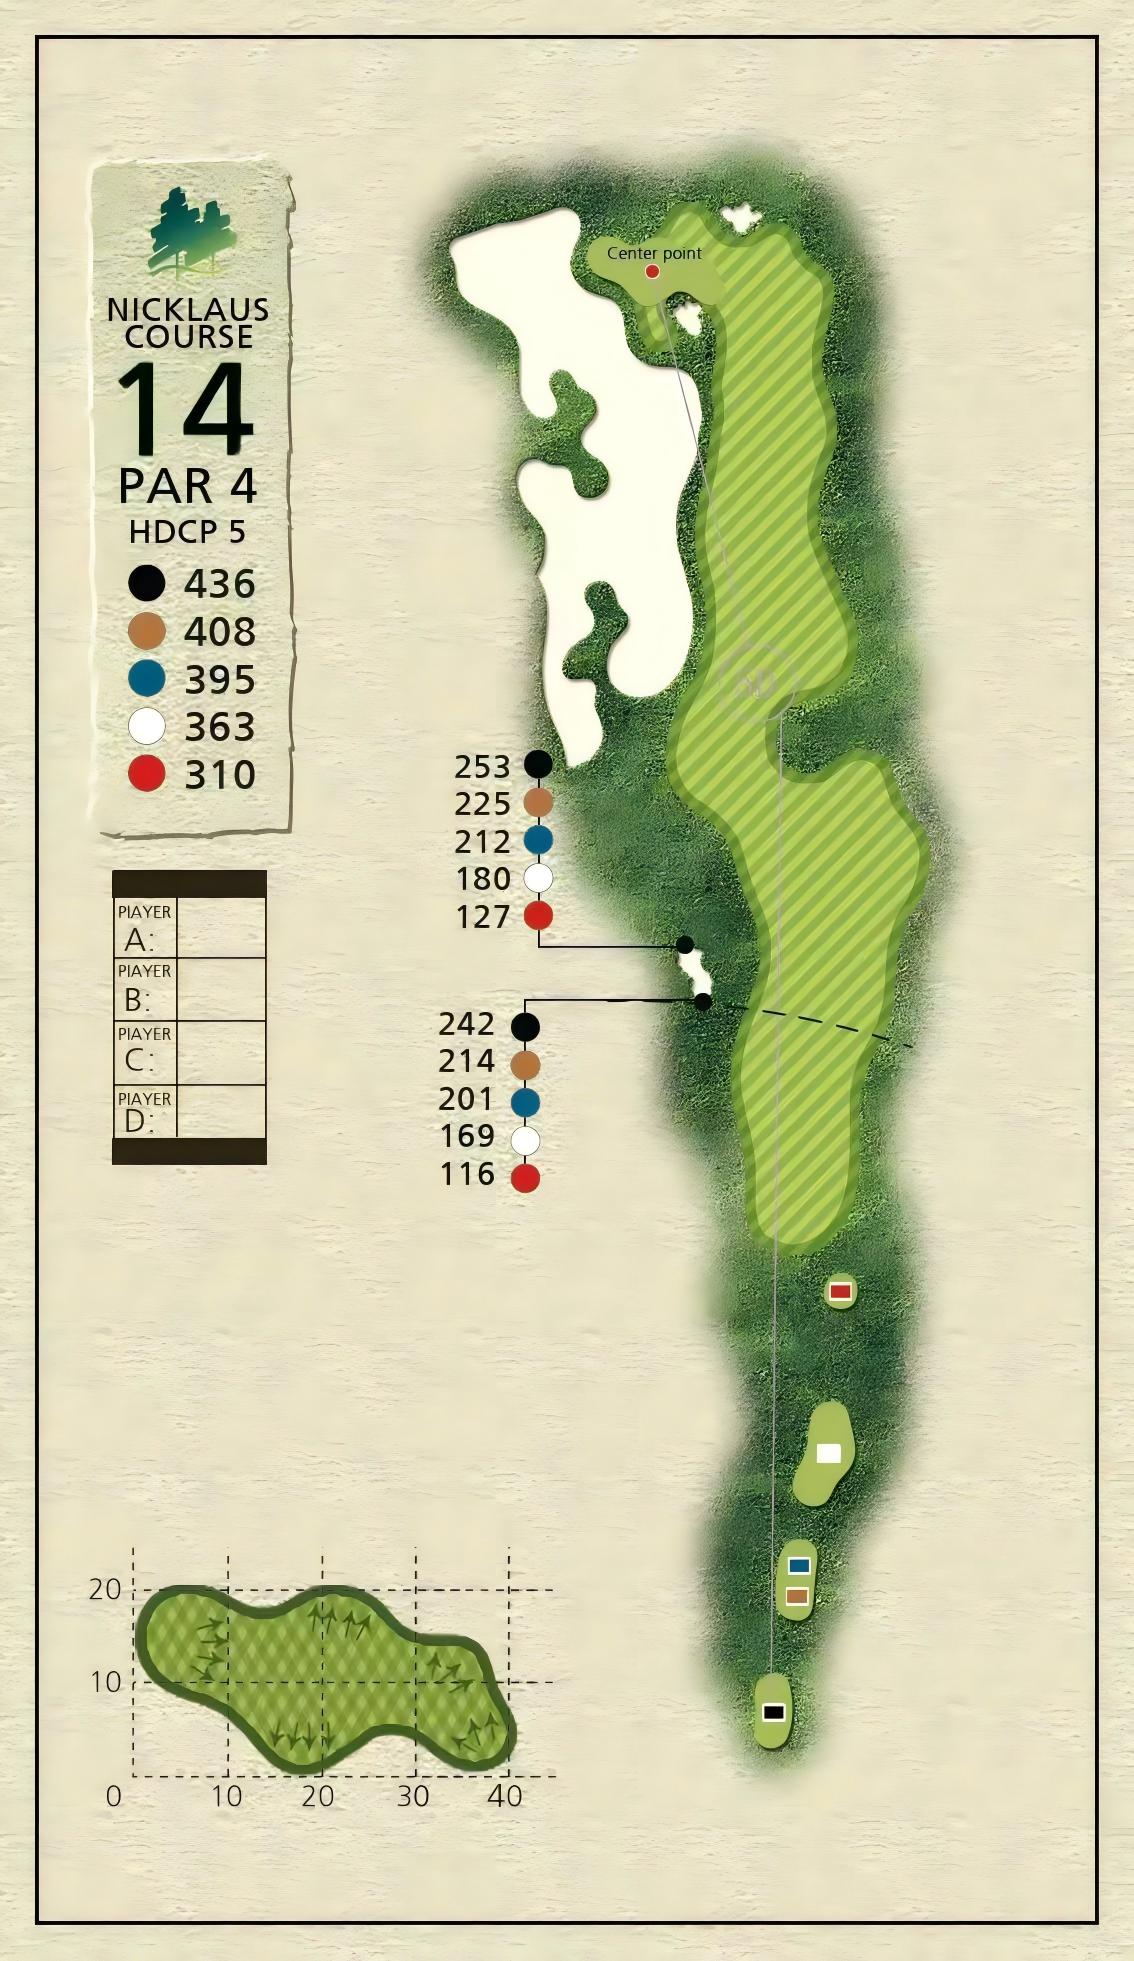
The tee shot is not particularly difficult; aim for the distant signal tower. If you are accurate with your fairway wood, aim for the right side of the fairway. This hole features the most challenging green to hold. When approaching the green, consider your lie and avoid aggressive shots if you cannot use a mid-iron or shorter club. Aim for the safe landing area on the right side of the green and abandon any thoughts of making birdie. Overly aggressive play can lead to significant trouble.
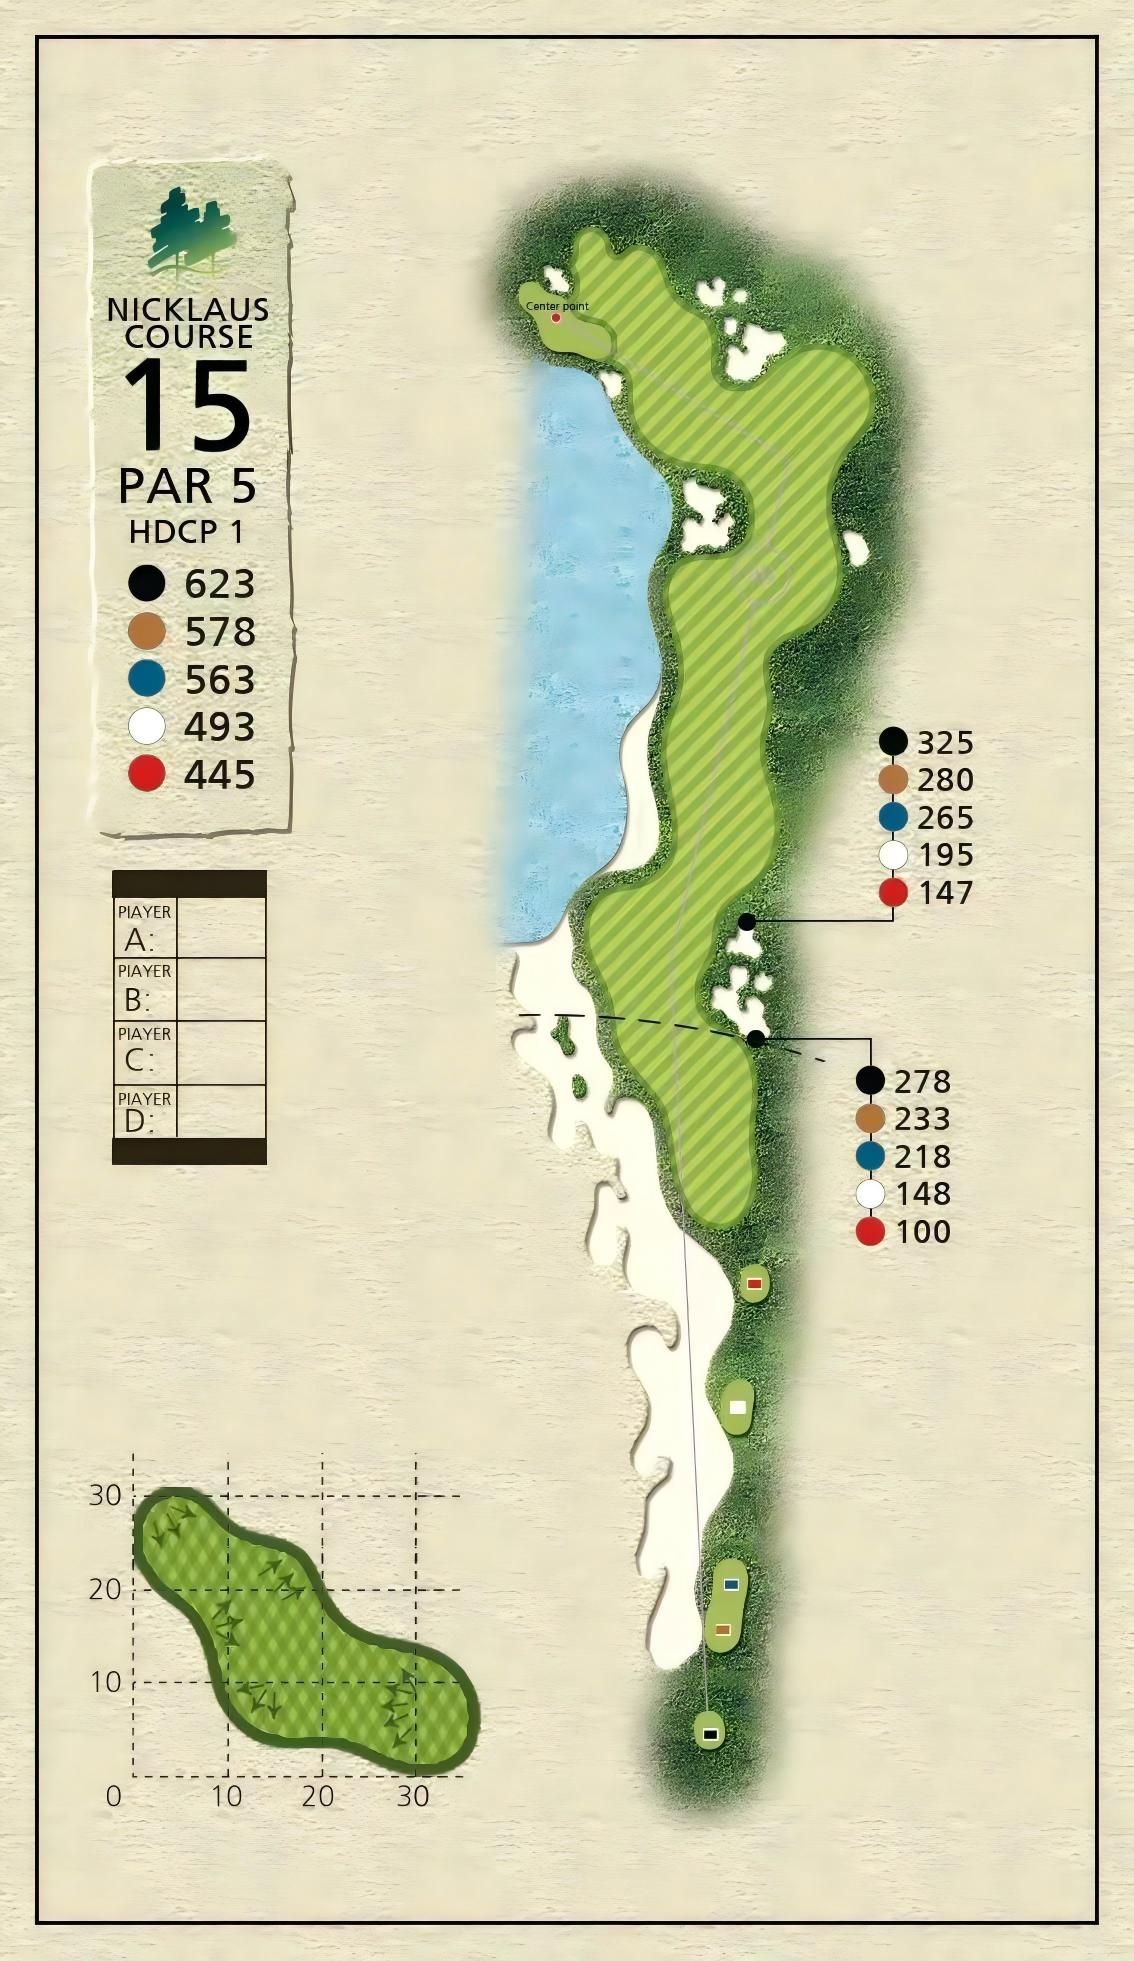
The lake in front of the green makes it nearly impossible to reach in two. Avoid the left-side lake off the tee; a drive within 280 yards will safely land on the fairway. For your second shot, ask your caddie for the distance to the 100-yard marker on the left side of the fairway. Landing here will provide the best angle for your third shot to the green.
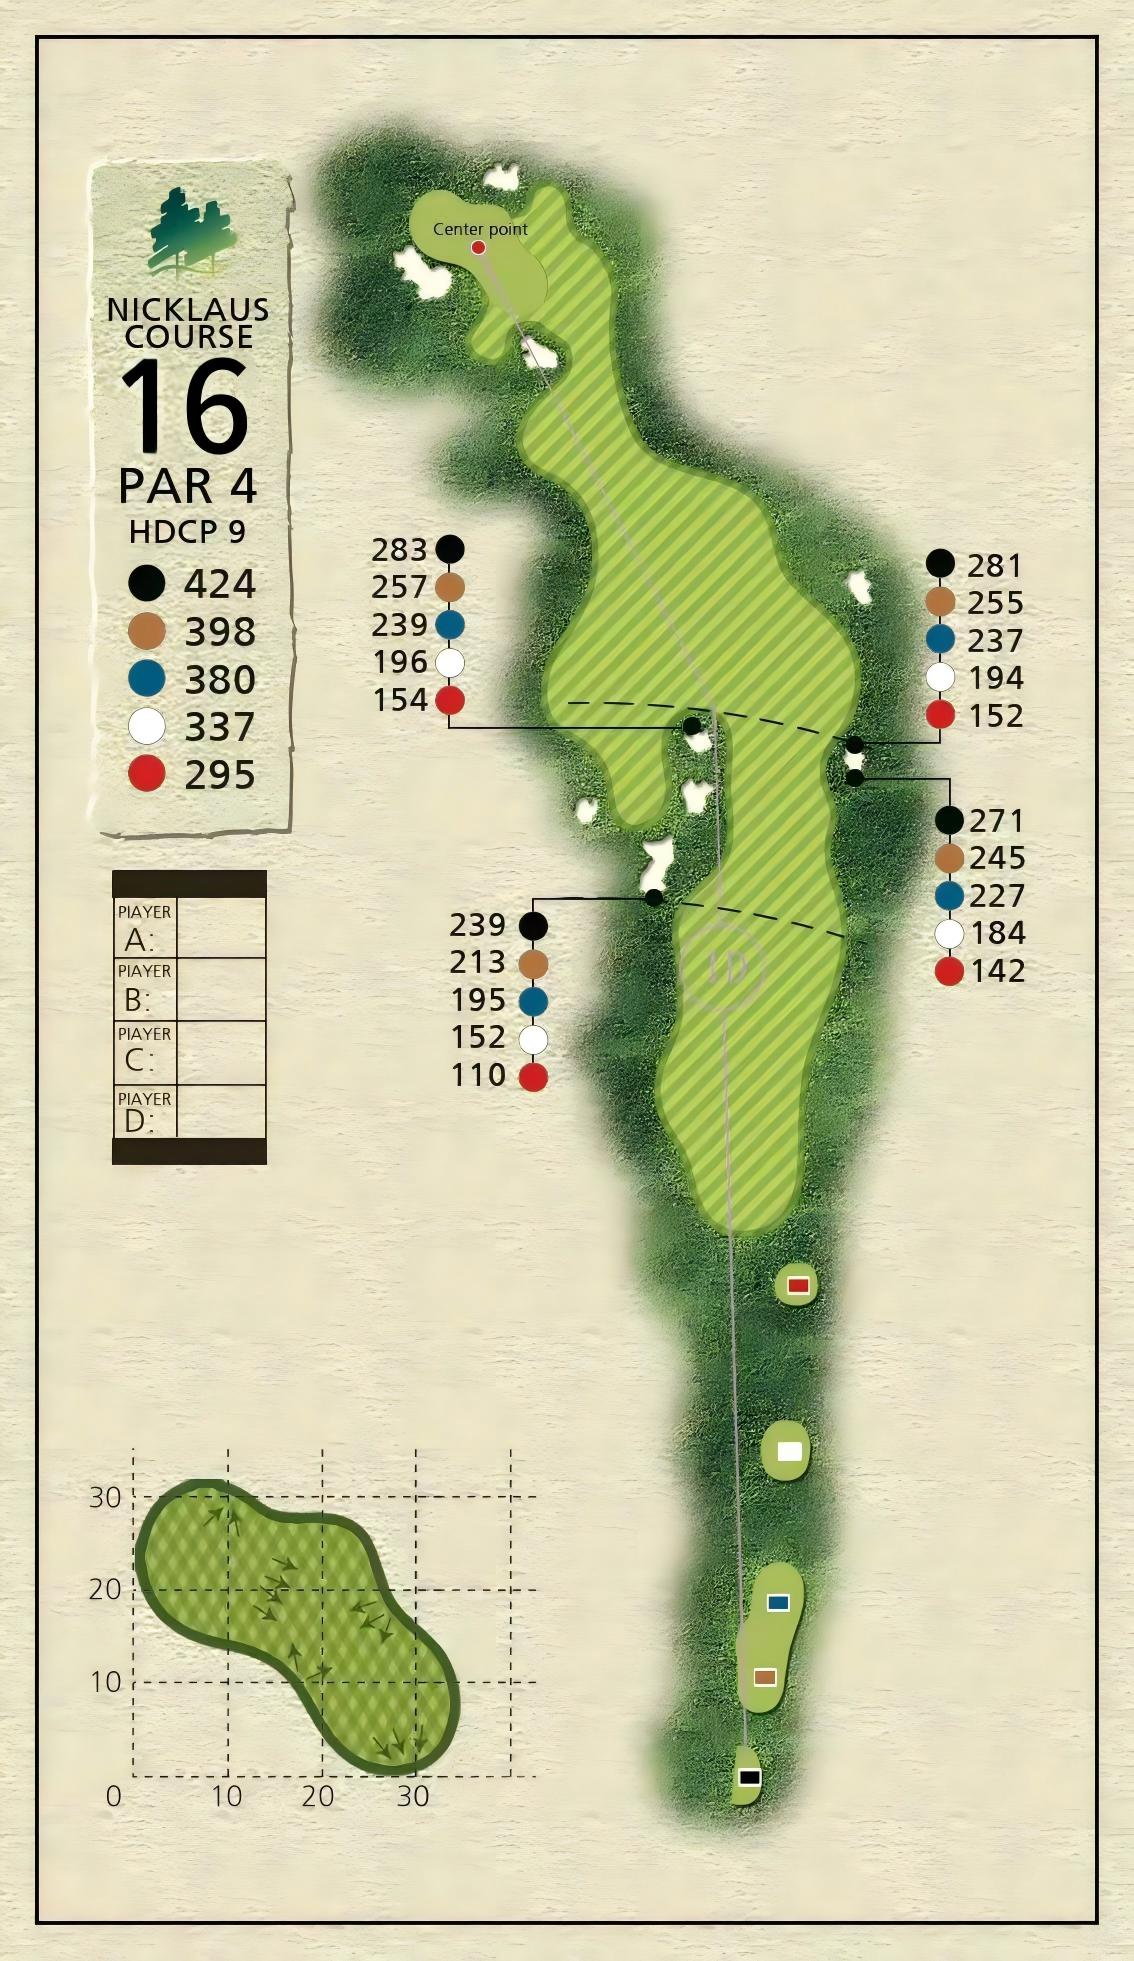
This hole features a slight left turn. The bunker in the middle of the fairway is the biggest obstacle. If you land in the bunker, reaching the green in regulation is unlikely. A drive over 290 yards will clear all the bunkers, leaving a wedge distance to the green.
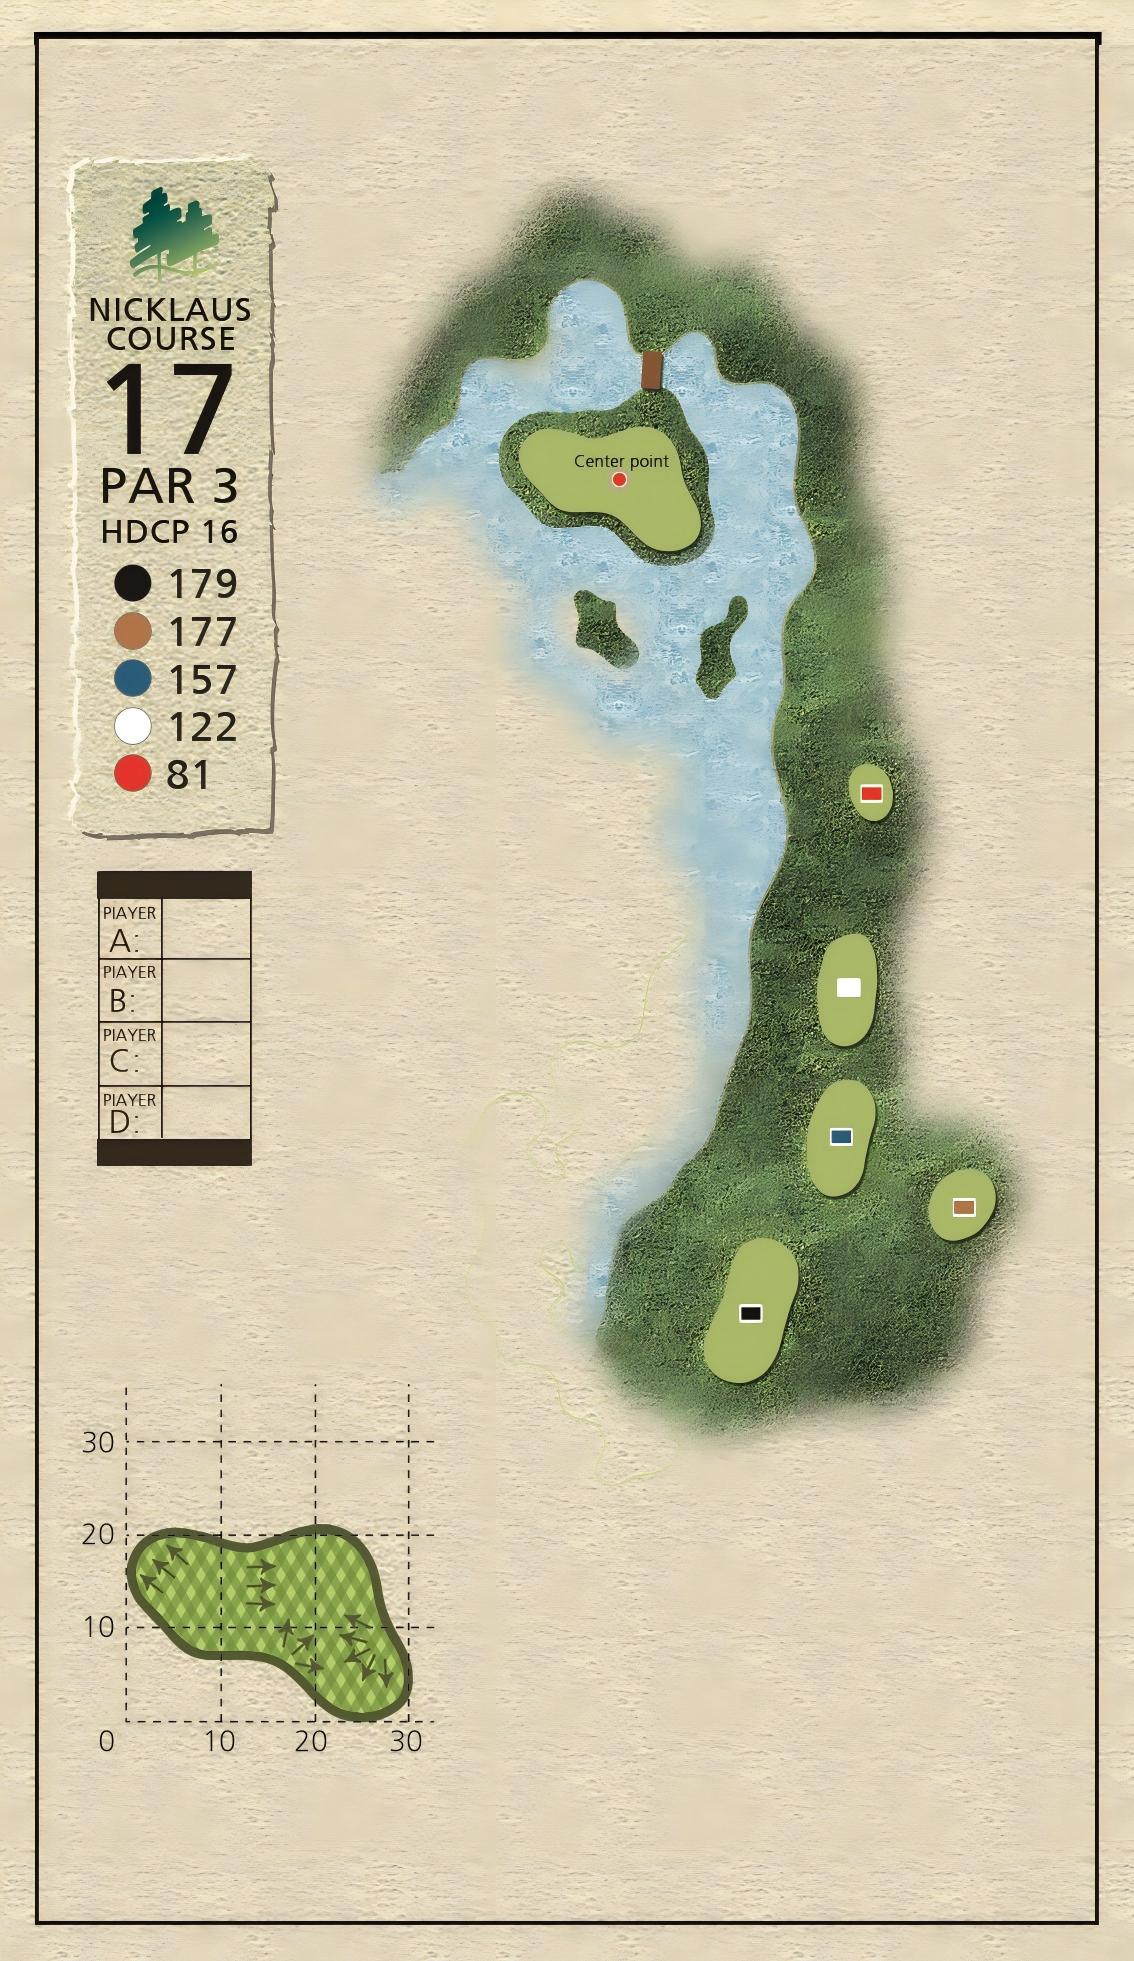
This hole features a distinctive island green. Aim directly at the pin, targeting the center of the green. Ensure your shot carries at least 170 yards to increase your success rate. The pin positions in the front-right and back-left are the most likely to result in a water hazard.
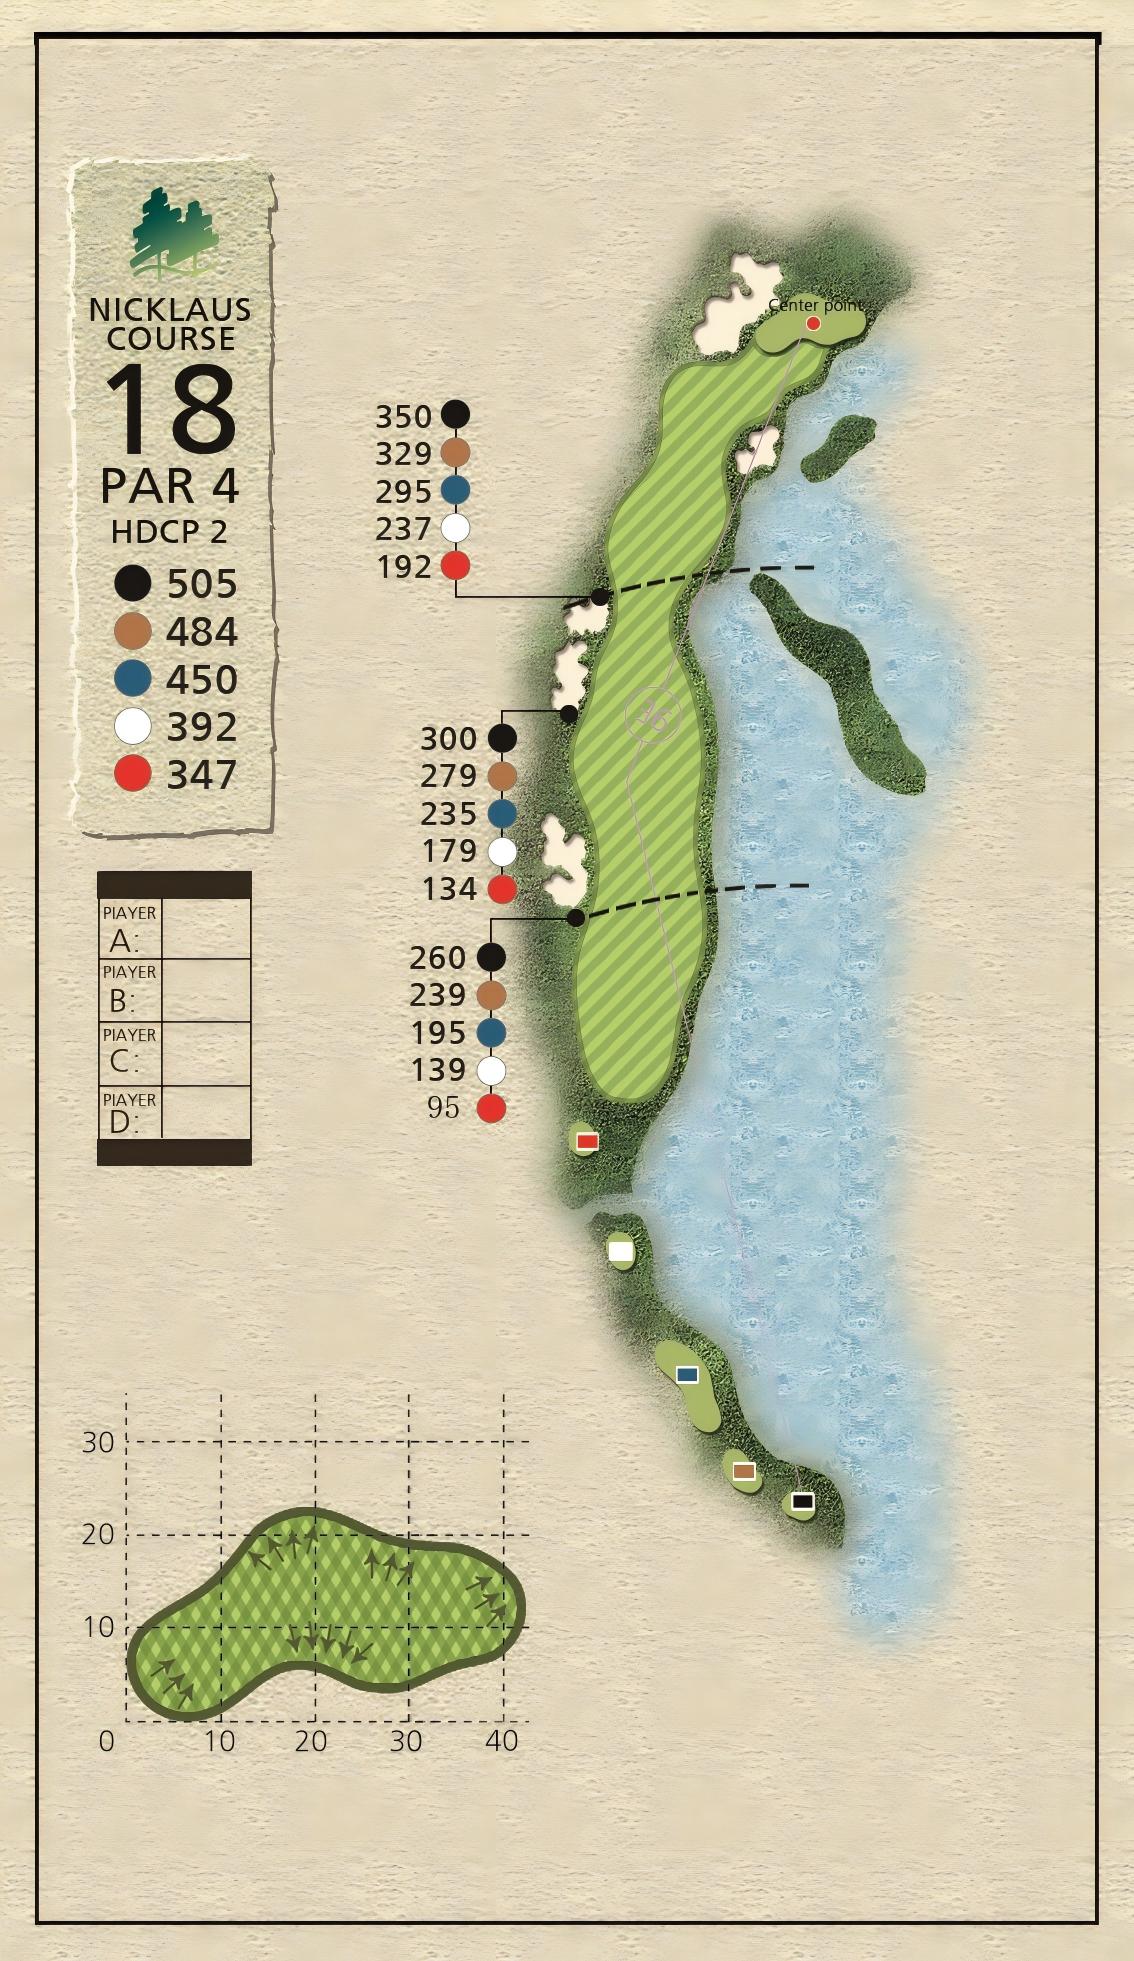
This is a long par 4 with a lake protecting the front of the green, making it difficult to reach in two. The left bunker is 260 yards away, and you need to avoid the water hazard on the right. Aim left rather than right throughout the fairway. If you can control your landing spot around 280 yards, the area between the two bunkers is a suitable landing zone, significantly increasing your chances of reaching the green in two.
This hole features a relatively flat fairway. A 250-yard drive will clear the bunker in the middle of the fairway. For your second shot, avoid the bunker on the right side of the green. Do not overly pursue the pin position; if the risk is too high, consider the front-left area of the green as the best landing spot.
This is a cleverly designed par 5. Without an exceptionally long drive, reaching the green in two is unlikely. Pay attention to the landing area for your second shot, aiming for the left side of the fairway. Ask your caddie for the distance to the middle bunker, leaving yourself 100-130 yards for the best approach to the green. If your drive exceeds 310 yards, you can clear the right bunker and land on the right side of the fairway. For your second shot, consider using a long club to clear the bunker and attack the green. Even if you come up short, landing on the right side of the fairway will give you a better angle for a chip shot.
This is an exceptionally long par 3. Avoid the bunker on the right side and ensure your shot carries at least 225 yards to clear the front-left bunker. Regardless of the pin position, aim for the bunker direction, preferring to overshoot rather than come up short.
This is a challenging par 4. The landing area around 290 yards is narrow, with only about 40 yards of fairway between the bunkers. Avoid the bunkers on the right side of the fairway. Consider landing your drive around 270 yards, where the fairway is about 50 yards wide. The second shot to the flat green requires precise distance control. The front bunker is the most likely to catch your ball, so ask your caddie for the exact distance to clear it. The back-left area of the green is more spacious, providing a safer landing spot.
The tee shot is not particularly difficult; aim for the distant signal tower. If you are accurate with your fairway wood, aim for the right side of the fairway. This hole features the most challenging green to hold. When approaching the green, consider your lie and avoid aggressive shots if you cannot use a mid-iron or shorter club. Aim for the safe landing area on the right side of the green and abandon any thoughts of making birdie. Overly aggressive play can lead to significant trouble.
The lake in front of the green makes it nearly impossible to reach in two. Avoid the left-side lake off the tee; a drive within 280 yards will safely land on the fairway. For your second shot, ask your caddie for the distance to the 100-yard marker on the left side of the fairway. Landing here will provide the best angle for your third shot to the green.
This hole features a slight left turn. The bunker in the middle of the fairway is the biggest obstacle. If you land in the bunker, reaching the green in regulation is unlikely. A drive over 290 yards will clear all the bunkers, leaving a wedge distance to the green.
This hole features a distinctive island green. Aim directly at the pin, targeting the center of the green. Ensure your shot carries at least 170 yards to increase your success rate. The pin positions in the front-right and back-left are the most likely to result in a water hazard.
This is a long par 4 with a lake protecting the front of the green, making it difficult to reach in two. The left bunker is 260 yards away, and you need to avoid the water hazard on the right. Aim left rather than right throughout the fairway. If you can control your landing spot around 280 yards, the area between the two bunkers is a suitable landing zone, significantly increasing your chances of reaching the green in two.
Join us from September 8th to 14th at the Reignwood Golf Club - Nicklaus Course, and immerse yourself in the unparalleled excitement of the GOLFJOY OPEN. Cheer on your favorite players and witness golfing excellence at its finest!